
 |
The subject of this article has been removed from the game.
|
|
This article needs your help. The reason given was:
Please edit this page to resolve the problem and remove this tag. |

City of Abominations (CoA) was a weekly event that occurred every Wednesday, however as of the Neverfall Content Update, the event has since been deactivated.
When it opens players have 10 minutes to enter via. the Adventure Assistant or Khatru Pup, and the entry fee is 20k. There is a limit to how many people can enter, like Dragon Temple, and only level 50+ are able to enter. It is not a PK instance however, and there are four different instances (all of which have identical mobs/rooms). Those instances are Phoenix, Tiger, Dragon, and Tortoise. If you die in the instance you are revived in the same instance at a random corner. If you disconnect, you're kicked out without a refund.
The mobs drop Astral Orbs, which you can trade for prizes. The problem is getting enough orbs. To get enough orbs for the top prize ring you need 400 orbs if your instance wins and 600 orbs if your instance loses (see the Rewards section below for details). All mobs are "?" mobs too so your damage is reduced, and their HP ranges from 1m to 3m. Orbs cannot be traded so if you want the ring you'll have to work together as a squad and have only one person collecting. The downside however, you can't pick your squads since you're randomly thrown into one of the instances. If you can't trust your group then it's best to use random distribution.
The mobs are spawned at 9:00 PM server time. At that time you have up to 1 hour (usually only around 30 minutes though) to start gathering orbs by killing these boss-level mobs. Once that hour ends or the total of all instances hits 10,000 points(verify), the mobs are unsummoned, even if you're in the middle of a fight with one. When a mob dies it takes approximately 60-90 seconds for it to respawn. One major issue that makes it difficult to gather orbs is that random people run around accidentally luring (sometimes purposefully luring) mobs that are physical immune into your area.
Notes[ | ]
- Some bosses debuff you.
- All mobs have 0 physical defense and 0 magical resistance so debuffs are ineffective.
- Like Dragon Temple, some skills don't work on mobs (Sharpened Tooth, Amplify Damage, Extreme Poison).
- Some bosses have AoE.
- AoE damage from bosses with AoE damage will frequently interrupt skills.
- Players below level 100 receive a Heavenly Blessing bless box that increases their Attack Level, Defense Level, and HP. The exact bonuses depend on your level, with lower levels getting higher bonuses. (The bless box vanishes when you leave CoA.)
- Depending on the bosses you fight, you may drain quite a bit of charm (especially without a cleric).
- Dark Messengers at each corner repair equipment on their trade list, remember to repair before the event starts.
- Astral Orbs, which drop from the bosses when you kill them, cannot be traded. If you want one person in your squad to get all of them, then create the squad using Free drop distribution, instead of Random, and then have that person collect all of the drops.
- Killing a boss in your instance contributes to the point total for your instance. The value for each boss is proportional to their HP, so a 1M HP boss gives 10 points, a 1.5M HP boss gives 15 points, and so on. 1 point is awarded for every Netherworld Evil killed or Yama Order farmed.
- When the total points for all instances hits the point maximum (an unknown value, but probably 10,000 points(verify)) CoA ends and the highest scoring instance gets reduced prices on most rewards (see below).
- When the event is finished be sure to turn in your orbs at the second Dark Messenger that spawns near the first. (One has an option to exit and the other has an option to trade orbs.)
Rewards[ | ]
When the event ends you can turn in your Astral Orbs for various rewards at the Dark Messenger that appears. If you're in the winning instance then the costs of most rewards will be 1/3 to 1/2 off.
| Item Name | Normal Cost | Winning Cost | Description |
|---|---|---|---|
| ☆Seal of Eternal Solitude | 600 | 400 | Level 80 ring, +100 to magic and physical attacks, +7-8 Dex and Vit, +3% crit. |
| Warsoul Tag | 6 | 3 | Trade in at Jolly Old Jones for grade 8-10 shards (3-15 Tags for G8 shards, 12-60 G9, & 36-180 G10), Pages of Fate, or Old Book Pages (for Sage/Demon skills). Note: Item cannot be traded. |
| Badge of Strength | 100 | 50 | Worth 2,000 SP; use 10 to make a Sign of Strength. |
| Badge of Bravery | 600 | 400 | Worth 2,000 SP; use 10 to make a Sign of Bravery. |
| Badge of Courage | 100 | 50 | Worth 8,000 SP; use 10 to make a Sign of Courage. |
| Mysterious Chip | 10 | 10 | Can be used at the Mysterious Merchant to make various molds. Note: Item cannot be traded. |
The Mysterious Chips are the only item that costs the same regardless of whether your instance wins or not. Also, City of Abominations is the only place where you can get most of those badges, which are needed to craft some level 90 Rank VI weapons at the Messenger of the Sages (see here).
Alternately, you can turn in your Astral Orbs using the Quest option at the Dark Messenger, which gets you 3,000 Exp + 1,000 SP normally, or 9,000 Exp + 3,000 SP if you're in the winning instance, for each Astral Orb you turn in this way. Be sure to do this with any leftover Astral Orbs you have before leaving, since any you have with you will vanish when you leave the instance.
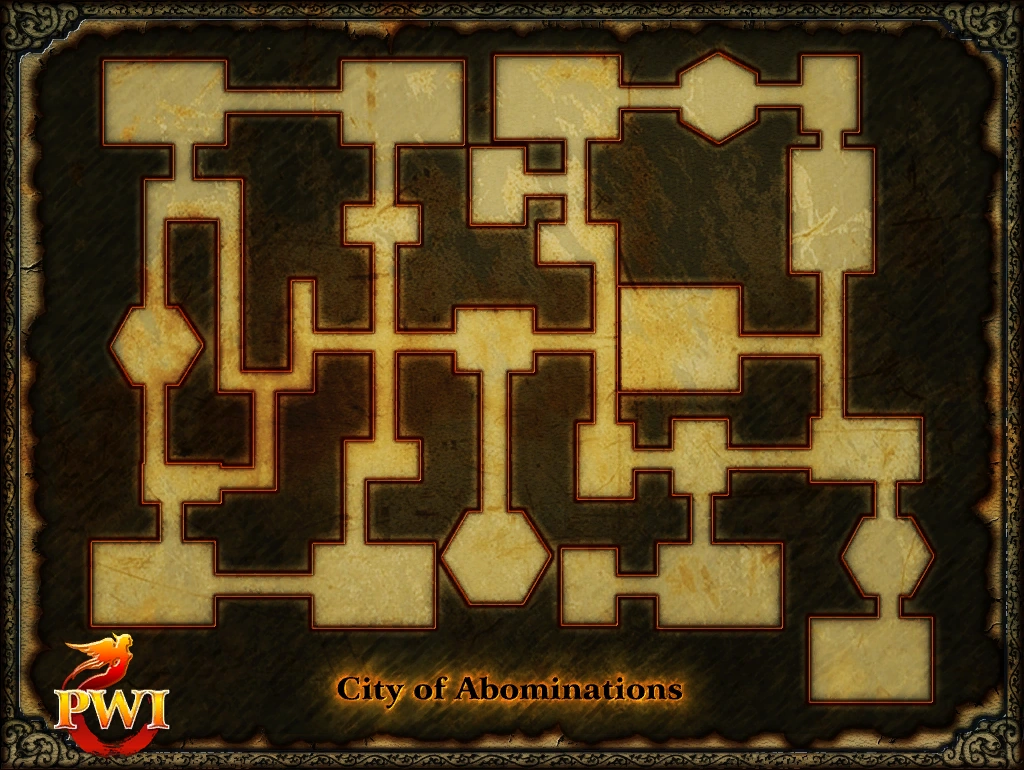
Maps[ | ]
Monsters[ | ]
Mobs, their immunities, and the number of orbs they drop:
| Name | HP | Orbs | Immunities | AoE/Debuff |
|---|---|---|---|---|
| Dread Minion: Bronze | 2 mil | 21 | None | AoE metal def debuff |
| Dread Minion: Cenequus | 2 mil | 21 | None | Magical AoE damage |
| Dread Minion: Guarnob | 2 mil | 21 | None | ??? |
| Dread Minion: Judge | 2 mil | 21 | Physical | PDef debuff on tank |
| Dread Minion: Blood | 2 mil | 21 | Physical | Mag AoE damage + movement speed debuff |
| Dread Minion: Soul | 2 mil | 21 | Physical | Mag AoE damage |
| Death Knight: Doom | 1 mil | 9 | Physical | AoE damage + PDef debuff |
| Death Knight: Naught | 1 mil | 9 | Physical | AoE damage |
| Tyrant: Flamol | 2.5 mil | 24 | Fire | Magic AoE damage + attack rate debuff |
| Tyrant: Icika | 2.5 mil | 24 | Water | Magic AoE damage + movement speed debuff |
| Ancient Sand Fiend | 1 mil | 9 | Earth | None |
| Tyrant: Tornada | 2.5 mil | 24 | Physical & Earth | Phys AoE damage |
| Requiem Tower | 1.5 mil | 15 | Physical & Metal | Constant AoE damage |
| Dread Servant: Blade | 2.5 mil | 24 | Physical | AoE damage + PDef debuff |
| Dread Servant: Edge | 2.5 mil | 24 | Elemental | None |
| Dread Lord: Hengchih | 3 mil | 30 | None | front AoE (type?) |
| Death Knight: Dimensic | 1 mil | 9 | Physical | AoE damage |
| Death Knight: End | 1 mil | 9 | Physical | AoE damage + PDef debuff |
| Soul of Thromh the Mighty | 1.5 mil | 15 | None | None |
| Rend Razorjaw's Soul | 1.5 mil | 15 | None | None |
| Poison Tail Occultist's Soul | 1.5 mil | 15 | None | None |
Tips[ | ]
The ideal spot for this event would be at #20. At that spot you can have members lure both Ancient Sand Fiends (the #11s on the West side of the map), the Poison Tail Occultist's Soul (#21), and the Soul of Thromh the Mighty (#19) to Rend Razorjaw's Soul (#20). None of these mobs AoE, all are physical, and all can be damaged by physical damage. So, with proper luring, you could set up a zhen to kill them.
If you can't get that, the Southeast corner with Dread Minion: Bronze (#1), Dread Minion: Cenequus (#2), and Dread Minion: Guarnob (#3) can also be mass AoE attacked, or done rapidly in a loop if you have 5 APS attackers in your squad (one or more members attack while another mostly collects drops).
Daily Quest Rewards[ | ]
After the event is finished, another Dark Messenger NPC will spawn with some daily quests involving Netherworld Panacea:
- Non-winning instance:
- Exchange 1 N. Panacea for 8,000 Exp
- Exchange 10 N. Panacea for 80,000 Exp
- Exchange 10 N. Panacea for 80 Reputation (up to 5 times for a total of 400 Reputation)
- Exchange 20 N. Panacea for 1 Mystical Pill and 1 Holy Pill
| Dungeons | |
|---|---|
| The Midlands |
|
| Call to Duty | |
| Lothranis and Momaganon | |
| Morai | |
| Primal World | |
| Celestial Vale | |
| The Western Steppes | |