
Heavenfall Temple is a solo dungeon introduced in the PWI War Front expansion. Players can only enter the temple alone and cannot take other players with them, even if they are in a squad. It is located in Lothranis and is accessible through Heavenly Music Pavilion (434, 472 ↑43) or through any Illusion Stone in Archosaur for a 30,000 silver coin fee. Upon entering, the player will lose any buffs or debuffs they may have.
When the player meets the prerequisites to enter the temple they will receive a quest to receive further information from the Bodhisattva of Light located outside of the temple, though they do not need to speak with her to enter.
Overview[ | ]
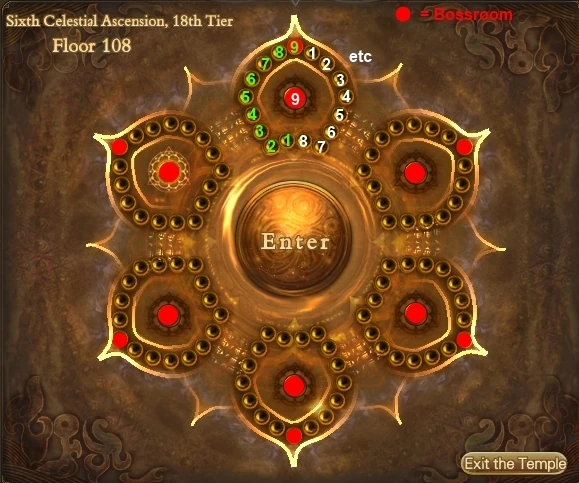
Room selection in Heavenfall Temple.
Heavenfall Temple consists of 108 repeating rooms that increase in difficulty as the player progresses. The levels are separated into 6 Ascensions, where each half consists of 8 normal levels and 1 boss level. The order of normal levels that the player encounters is random but they will encounter each type of normal level at least once before a boss level.
The dungeon resets every Wednesday at 7am server time. All previous progress through the 108 levels will be lost, including buff points. Players can redo the levels after the dungeon has reset for more prizes.
Guardian Charms are disabled inside the dungeon and therefore will not replenish Health, due to the unique buffs the temple has. Spirit Charms function normally inside the dungeon. If the player dies in the temple, they will not lose any experience but will automatically fail the level they are on.
Many of the levels use higher-quality graphics, therefore it is recommended that the player ensures their effects are not turned down to the minimum setting.
Weekly Quest[ | ]
Each week, you can get a quest from the Master of Solitude named "The Diabolic Four (Weekly)" to defeat the Four Wraith Kings in room 9 or 18. To be able to receive the weekly quest, you must have completed the introductory quest "Heavenfall Temple" by talking to the Bodhisattva of Light outside of Heavenfall Temple.
Upon killing the Four Wraith Kings, the quest will complete automatically. You will receive 2,000,000 experience and 800,000 spirit at level 100; if you are below level 100, the experience and spirit you receive will be lower depending on your level.
Rankings[ | ]
Heavenfall Temple has a rankings board for both local servers and cross-servers, separated by character class. There are no prizes for reaching a certain rank on either leaderboard other than bragging rights. The rankings calculate the total amount of time taken to complete the entire dungeon during the week. A player will only enter the rankings once they have completed the dungeon. The rankings board can be accessed either by talking to the Master of Solitude in the Heavenfall Temple lobby, or by talking to the Heavenfall Rankings NPC located in South Archosaur, North Archosaur, and the City of a Thousand Streams.
Local server rankings are locked every Wednesday at 6am server time, reset at 7am, and then are unlocked at 9am server time. Cross-server rankings are updated at 6:30am (timezone unknown) each day and are never reset.
Buffs[ | ]
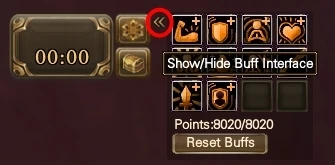
Buff selection window in Heavenfall Temple.
Heavenfall Temple comes with its own set of buffs. These buffs greatly increase a character's stats further than any other buff in the game. They can only be used inside the temple and will disappear upon leaving the dungeon. Heavenfall Temple buffs are essential for most players if they intend to complete the last levels of the dungeon.
To access the buff interface, click the » button on the Heavenfall Temple interface located to the left of the screen. There are a total of 10 buffs; the top and bottoms rows are long-lasting buffs that can be reset at any time without losing the points used to upgrade them, while the middle row of buffs are short-lasting buffs that permanently use up points. If the player leaves the dungeon, the points used for the long-lasting buffs will be unassigned when they return, allowing them to spend them again.
Each buff can be activated by clicking on it. Long-lasting buffs stack, meaning that the player can click on the buff multiple times to increase their stats further. The player can also reset their buffs by clicking on the Reset Buffs button, which will give back all of the points spent on long-lasting buffs.
Buffs cost points to activate. Points can be earned through completing levels, and players can complete the same level multiple times to stack points. Initially each level completed will give 10 buff points, with the amount increasing by 5 points every 9 levels until levels 28-36, after which the amount increases by 10 points every 9 levels. Alternatively the player can exchange 20 War Avatar Orders or 1 million silver coins at the Master of Solitude for an item that gives 4000 buff points. Multiple of these items can be used to stack up points.
A total of 12000 points are required to activate and max out every buff.
The types of buffs the player can activate are as follows:
| Icon | Effect | Cost | Notes |
|---|---|---|---|
| Increases Physical and Magic Attack by 5000. | 100 points | Can stack up to 20 times. | |
| Increases Physical Defense by 3000. | 100 points | Can stack up to 20 times. | |
| Increases Elemental Resistances by 3000. | 100 points | Can stack up to 20 times. | |
| Increases Maximum Health by 2000. | 100 points | Can stack up to 20 times. | |
| Grants Invincibility for 15 seconds. | 10 points | Cooldown: 5 minutes. Points are spent permanently. | |
| Restores Health over 30 seconds. | 5 points | Cooldown: 1 minute. Points are spent permanently. | |
| Reduces incoming damage by 60% for 30 seconds. | 10 points | Cooldown: 5 minutes. Points are spent permanently. | |
| Increases attack range by 20 meters for 20 seconds. | 10 points | Cooldown: 5 minutes. Points are spent permanently. | |
| Increases Attack Level by 30. | 100 points | Can stack up to 20 times. | |
| Increases Defense Level by 10. | 100 points | Can stack up to 20 times. |
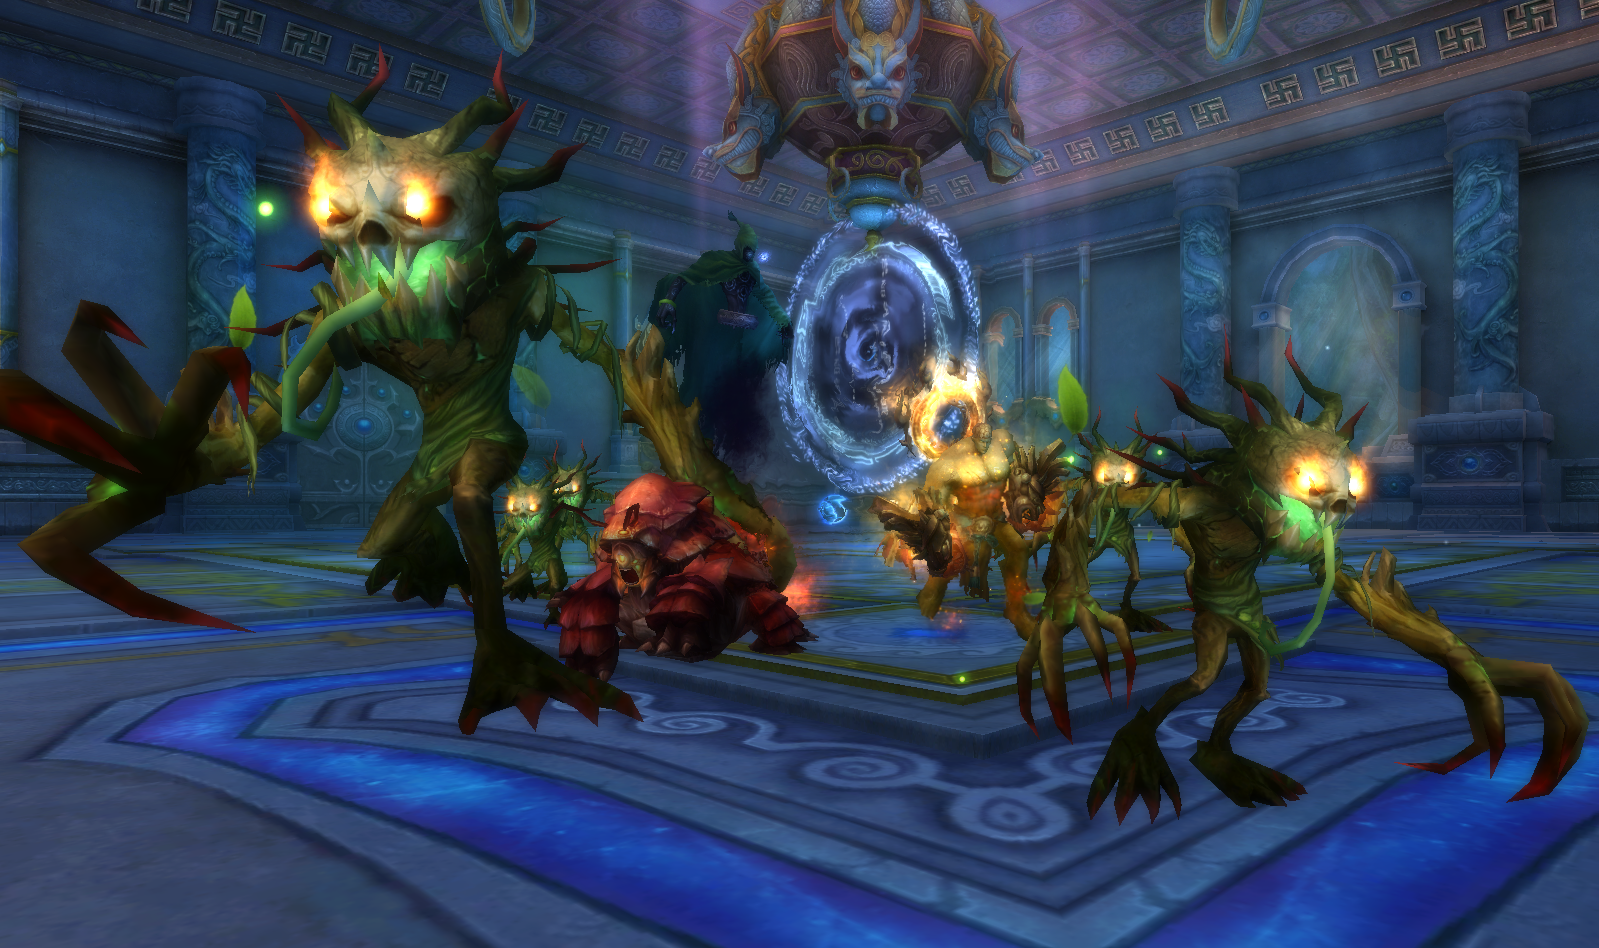
Challenge of the Believers[ | ]

The Vile Monk, 2 Servants of Mara Papman, and a Bewitched Follower.
The objective of this challenge is to defeat all of the monks and servants without killing any Bewitched Followers. When the challenge begins, 3 groups of monsters will spawn at opposite ends of the room. Each group consists of a Bewitched Follower, 2 Servants of Mara Papman, and 1 Monk. The Bewitched Followers only have 1 Health and therefore can be easily killed through AoE skills. Reflecting skills such as Soul of Vengeance or Bramble Guard will also kill the Bewitched Followers as they will attack the player.
There are 3 different types of monks with their own debuffs they can cast on the player from time to time:
- Malicious Monk: Curse debuff which increases the amount of damage the player will take.
- Vile Monk: Bleed DoT effect.
- Vicious Monk: Deals metal damage and casts a Metal DoT effect.
All debuffs that the monks cast can be purified. Both the Curse debuff and the Bleed DoT can be blocked using physical immune skills such as Psychic Will or Expel.
In later floors both the bleed and metal DoT effects will become stronger, making it more difficult for the player to survive. While the curse debuff effect does not change, the amount of damage enemies can deal to the player will increase in general, also making it more difficult.
When one enemy from a group of enemies is attacked, the entire group will be provoked and will hit the player with ranged physical damage and won't move from their area. For this reason it's recommended that the player clear out both the monk and servants from a single group before moving onto the next.
Challenge of the Protectors[ | ]

Two Protectors defeating monster waves.
The objective of this challenge is to kill all of the monsters and the final boss without 10 monsters or the boss reaching the end portal. Upon starting the challenge, the player will receive a Mirror of the Sages in their inventory. Two portals will spawn to the north and south, with a blue path going between them. Multiple groups of NPCs will spawn along the blue path, and a Celestial Bead will spawn in the middle of the room.
A total of 10 waves of monsters will spawn, with 10 monsters in each wave. They will spawn at the northern portal and make their way towards the southern portal via the blue path. The player cannot deal damage to the monsters normally, but can slow them if required. To damage and kill the monsters the player must make use of the NPCs throughout the room by activating and upgrading them.
There are 2 different protectors that can be activated. Each protector has a total of 3 levels.
- Protector Andolor: Deals a high amount of damage to a single target and curses them, making the target take more damage.
- Basic: Increases damage taken by mobs by 50%.
- Medium: Increases damage taken by mobs by 50%, increases Protector's attack by 40%. Has a blue aura.
- Advanced: Increases damage taken by mobs by 50%, increases Protector's attack by 80%. Has a golden aura.
- Protector Mosaro: Deals a small amount of damage to multiple targets in a range, and slows them.
- Basic: Slows enemies by 40%.
- Medium: Slows enemies by 55%. Has a blue aura.
- Advanced: Slows enemies by 70%. Has a golden aura.
In order to activate or upgrade the protectors, the player must recharge their Mirror of the Sages by damaging the Celestial Bead in the center of the room to gain points or Buddha Corona. The player can track how much Buddha Corona they have by checking their quest log or quest tracker for the quest named "Tracking Buddha Corona", where they will see the remaining points they have. As levels get higher, the Celestial Bead will gain more Health, making it harder to gain Buddha Corona. If the player kills the Celestial Bead they will gain an additional 20 Buddha Corona, though this is usually not necessary. The player will only require a total of 28 Buddha Corona to activate and upgrade every protector.
To activate or upgrade a protector, the player must target the protector of their choice and then use the Mirror of the Sages by right-clicking it in their inventory or clicking the on-screen prompt. By default a Protector Mosaro and a Protector Andolor will be activated at their basic level, while the rest of the room will consist of 8 pairs of protectors. The player will have to choose which protector to activate from the pair and cannot activate both at the same time as the other protector will disappear. An issue seems to occur when you try to upgrade a protector when it has something else selected (either you or the wave enemies) which could cause you to be unable to upgrade that protector.
After the 10th wave has spawned, Tainted Guardian Equidius will spawn. If the boss reaches the other portal, the challenge will fail. Unlike the monster waves, the player will be able to deal damage to the boss. He cannot be stunned or frozen but he can be slowed, though Protector Mosaro's slow will usually overwrite the player's slow effect if he is nearby. The player can typically take advantage of Protector Andolor's curse debuff to deal more damage to the boss.
Challenge of Energy[ | ]
Monsters surrounding the Energy Orb.
The objective of this challenge is to fully charge the Energy Orb. Upon starting the challenge the player will receive a Gold Hammer in their inventory. The Energy Orb will spawn in the middle of the room, with only 2,500,000 out of its maximum 10,000,000 Health. Dozens of monsters will also spawn around the room.
After a few moments, an on-screen message will appear requesting that an object needs to be brought to the Energy Orb within 30 seconds to charge it. The object will either be a Dragon Essence, Ginseng Fruit, or an Imp Gut. These objects can be found by damaging the monsters around the room. The monsters only need to be damaged a certain amount before they die on their own and spawn the object. Killing the monsters in 1 shot will cause them to spawn nothing. Each monster has different effects and will spawn different objects, which are essentially smaller versions of themselves.
- Wraithtouched Dragon: Spawns Dragon Essence. This monster will constantly stun the player for a very brief time, which interrupts the player's skills. In higher levels damaging this monster can become a challenge. The monster can be stunned, making it easier to damage. Standing close to the monster will cause it to also deal damage to the player.
- Ginseng Tree: Spawns 2 Sengin Fruits and 1 Ginseng Fruit. All three objects are identical in appearance. The player must push the Ginseng Fruit to the Energy Orb while ignoring the other two fruits. If the player gives the Energy Orb a Sengin Fruit, it will lose 1,000,000 Health.
- Timid Imp: Spawns Imp Gut. It has less Health than the other monsters. It will run away from the player when hit. The player can position themselves between the Imp and the Energy Orb to make it run towards the center of the room.
When a monster spawns the object, the player can target the object and use their Gold Hammer by right-clicking it in their inventory or clicking the on-screen prompt to push it in front of them. The player can also move the object using knockback and reel skills. Once the object has reached the Energy Orb, it will gain 1,000,000 Health if the player has provided it with the correct object within 30 seconds. If the player fails to deliver the object on time or delivers the incorrect object, the Energy Orb will lose 1,000,000 Health. If its Health goes beneath a certain threshold, then the challenge will fail. The challenge will be complete once the Energy Orb reaches 10,000,000 Health.
Challenge of Calamity[ | ]

Sage Mahamayuri fighting the Avatar of Calamity.
The objective of this challenge is to kill the Avatar of Calamity before he kills Sage Mahamayuri. Upon starting the challenge the player will see these two bosses fighting each other. Green orbs will spawn around the room, and a purple-red ring will spawn to one side of the room. The player must have their effects settings set to at least the second-lowest option to be able to see the orbs.
A few seconds after the challenge starts, the Avatar of Calamity will become immune to damage, indicated by the on-screen message "Absorb the green orb to dispel the Avatar's divine protection!". To remove the immunity the player must stand in one of the green orbs. Alternatively the player can also AoE the Avatar of Calamity to activate green orbs if the AoE range is far enough, however this will also harm Sage Mahamayuri in the process and can potentially kill her. The orb will vanish and will not respawn for quite some time, meaning the player will have to continuously move to be able to damage the boss. The Avatar of Calamity will become immune to damage roughly every 15 seconds regardless of the player's actions.
During the challenge the player will also have to keep an eye on Sage Mahamayuri's Health. She cannot be targeted by the player so the only way to check her Health is by targeting the Avatar of Calamity. As he is targeting her, her Health bar will display to the right of his own Health bar, at the top of the screen. The player must have "Close target display" unchecked in the Optimizations settings to see this properly. As her Health lowers on-screen messages will also appear notifying the player that Sage Mahamayuri requires healing if the player cannot easily track her remaining Health.
To heal Sage Mahamayuri, the player must stand in the purple-red ring. This will cause the player to lose roughly a fifth of their maximum Health, which will replenish roughly a tenth of Sage Mahamayuri's maximum Health. The circle will drain the player's Health roughly every 5 seconds. If the player is a venomancer, mystic, or stormbringer, they can place their pets or summons in the circle instead which will also heal the Sage. If the player cannot easily heal themselves, they can opt to not use buffs that increase maximum Health, or take off their gear to reduce their maximum Health so that healing skills or apothecary items are more effective, since the Health drain is percentage-based.
Challenge of the Portal[ | ]

Several monsters spawned from the portal.
The objective of this challenge is to kill 100 monsters. Throughout the challenge, an orb of a particular color will spawn in a random location within the room. The player must have their effects settings set to at least the second-lowest option to be able to see the orbs. Running into an orb will cause a monster wave to spawn, consisting of 9 smaller monsters and 1 larger elite monster. The monster waves can also be triggered if the player casts an AoE skill on monsters near the orb. These monsters will spawn in the center of the room and start making their way towards the player, and another orb will spawn elsewhere in the room. A total of 10 orbs will spawn.
The types of monsters that spawn depend on the color of the orb. After 5 waves of monsters have spawned, the remaining waves will instead include some random smaller monsters from other groups, but will still contain the same elite monster that corresponds with the color of the orb the player runs into.
- Bright Blue Orb: Spawns a Copperman wave, which includes a Copperking. They deal physical damage to the player, sometimes from a short range and sometimes from melee range.
- Green Orb: Spawns a Blighted Dryad wave, which includes a Dryad Overmind. They deal physical damage to the player, and sometimes debuff the player with a poison DoT skill.
- Blue Orb: Spawns a Crazed Student wave, which includes a Crazed Master. They will deal physical damage, and can also stun the player for a short period of time.
- Red Orb: Spawns a Blazing Beetle wave, which includes a Blazing Beetle Queen. They will sometimes deal physical damage, and sometimes deal magic damage to the player from a short range.
- Yellow Orb: Spawns a Celestial Rhinodrake wave, which includes a Celestial Rhinodrake Matriarch. These monsters have twice the Health of other monsters. They deal physical damage.
After killing the larger elite monster in a monster wave, the Senior Monk will spawn in the middle of the room and deal damage to all of the smaller monsters in the room with a Blazing Strike. He can spawn multiple times.
In lower levels, the player can potentially gather up all 100 monsters and kill them all at once, however in higher levels the player may find this overwhelming and so they may opt to kill only 1 or 2 waves at a time. All monsters can be stunned, frozen, slowed, and sealed, making it easier for the player to kite and kill monsters especially if they are a ranged class.
Challenge of the Monk[ | ]
The Corrupted Monk.
The objective of this challenge is to defeat the Corrupted Monk. At the beginning of the challenge 4 Celestial Beasts will spawn at each corner of the room and slowly make their way towards the middle of the room. These monsters will power up the Corrupted Monk with buffs if not killed before they reach the middle. These buffs cannot be purged. Each monster gives different buffs:
- White Tiger: Increases the Corrupted Monk's Physical Defense.
- Crimson Phoenix: Increases the Corrupted Monk's Magical Defense.
- Azure Dragon: Increases the Corrupted Monk's Attack.
- Black Tortoise: Increases the Corrupted Monk's Health.
In earlier floors it is possible to kill all 4 monsters before they reach the center, however as the difficulty increases with higher levels players may have to decide to prioritize which monsters to kill and which buffs the Corrupted Monk should have, depending on the player's class.
The Corrupted Monk will eventually spawn in the center after the monsters would reach the center of the room. If the monsters are still alive at this point they will die on their own. The Corrupted Monk will not attack the player by default. After some time, the boss will cast Celestial Wraith's Strike. This attack will deal physical damage to the player, which can be considerably high damage in higher levels. The player can block it using physical immunity skills such as Psychic Will or Expel. The boss will announce its attack shortly before casting it, allowing the player to prepare.
In higher levels, the Corrupted Monk will cast a healing skill some time after he casts Celestial Wraith's Strike. Prior to casting the skill he will say "Your soul will burn!" and quickly cast the skill. It can be interrupted however can be difficult to do successfully as there is very little time to do so. He will repeat both of these skills in order.
Challenge of the Elements[ | ]


The 5 elemental totems.
The objective of this challenge is to kill all 5 totems in the room. When the challenge begins, 5 totems of each element will spawn around the room. After a short time, one of these totems will debuff you. The debuff consists of a DoT attack of the totem's corresponding element. The player cannot purify this DoT through normal means. While the DoT effect is active, the player will be able to deal double damage to another specific totem, and attacking another specific totem can remove the effect from the player. The DoT effect will be removed after 15 seconds if the player takes no actions to remove it.
Venomancer pets, mystic summons, and stormbringer summons can take the DoT damage in the player's place. If they die as a result, then no more DoTs will be cast for the remainder of the level. While this can be beneficial as the player can no longer die in the level, it also means the player will no longer be able to deal double damage to other totems.
When a totem debuffs the player, a message on-screen will be shown. In the player's chat box they will be able to see which totem they can deal double damage to, and which totem will remove their DoT effect. Generally the player will deal double damage to the elemental totem that is weak against the element of the DoT effect, while the effect can be purified by attacking the elemental totem that is strong against the element of the DoT effect.
- Fire Totem: The player deals double damage to the Metal Totem. Attacking the Water Totem will remove the effect.
- Wood Totem: The player deals double damage to the Earth Totem. Attacking the Metal Totem will remove the effect.
- Water Totem: The player deals double damage to the Fire Totem. Attacking the Earth Totem will remove the effect.
- Metal Totem: The player deals double damage to the Wood Totem. Attacking the Fire Totem will remove the effect.
- Earth Totem: The player deals double damage to the Water Totem. Attacking the Wood Totem will remove the effect.
One tactic for completing the challenge is to slowly damage each totem but not kill them, taking advantage of the double damage or removing the DoTs if they deal too much damage to the player. Once all totems are at a low amount of Health, the player can kill them all swiftly without suffering a DoT effect that they cannot purify because the challenge has ended or the totem required has died.
Challenge of the Pilgrim[ | ]

The Sage Pilgrim, surrounded by lit Protective Glyphs.
The objective of this challenge is to activate 10 Protective Glyphs within 3 minutes. This challenge is the only one that has a time limit. When the challenge starts, a Sage Pilgrim will appear in the room, along with 10 unlit Glyphs surrounding him. Every 5 seconds, a Celestial Guardian will spawn in the center of the room and attack the player. In higher levels Celestial Nullifiers may spawn alongside a Celestial Guardian, and is guaranteed to spawn at the highest levels.
If the player kills a Celestial Guardian, they will activate 1 Protective Glyph. A light beam will come shooting out of Glyphs as they are activated. Killing a Celestial Nullifier will deactivate 1 Protective Glyph. The amount of Protected Glyphs activated is constantly updated in the player's chat box. If a Celestial Nullifier is killed when no Protective Glyphs are activated then the player will fail the challenge. The player can also fail the challenge if the timer exceeds 3 minutes. It is not recommended for the player to use AoE skills during this challenge as it can increase their chance of failing the challenge if there are Celestial Nullifiers present.
Celestial Guardians deal a very low amount of physical damage and are generally not a threat. Celestial Nullifiers will deal a small amount of magic damage which can become quickly overwhelming in higher levels. These monsters will not trigger effects such as the mystic's Falling Petals skill. In higher levels players can kite or run around with the monsters to attempt to reduce the damage they take.
In higher levels, Corrupted Sages may also spawn. These monsters do not follow the player but will cast magic spells on the ground beneath the player. These magic spells will deal extra damage to the player if they stand in them and do not move. In the highest levels several Corrupted Sages may spawn at a time, meaning that several of these spells can damage the player at once if they do not move away from them. They can be killed with no effect to the Glyphs.
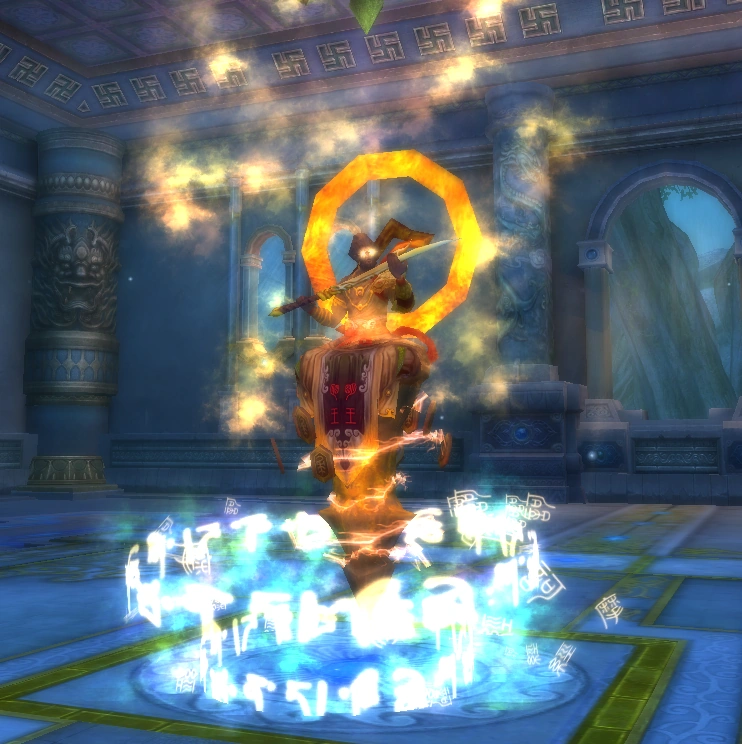
Four Wraith Kings (Rooms 9 and 18)[ | ]


The Four Wraith Kings.
These bosses are encountered in rooms 9 and 18. Upon starting the challenge 4 bosses will spawn around the room. The player can only fight 1 boss at a time, and can choose which order to fight each boss in. Each boss has a different effect that begins from the moment the player attacks the boss and continues on throughout the rest of the challenge, so it's important to kill the bosses in a specific order that is convenient for the player.
Each boss begins with a Magic and Physical Defense buff which wears off shortly after the player attacks them. The boss will also have a Deaden Nerves buff to prevent the boss from dying immediately and instead leave it at 1 Health. The player can kill the boss once this buff wears off a few seconds later. Another version of the boss will spawn at this point that the player cannot target or damage but will continue to cast the skill of that specific boss for the remainder of the challenge.
- Marei Tsou of the Noxious Swamp: Spawns a green pool on the ground where the player is standing. If the player stands in the pool it will deal magic damage to the player.
- Marei Sehk of the Howling Sea: Reels the player in towards them, and then begins casting an AoE attack indicated by a red circle on the ground. He will cast 2 more AoE attacks with their range increasing each time. If the player stands in the range of an AoE it will deal roughly 20% of the player's maximum Health.
- Merei Ciah of the Glacial Waste: Casts an AoE attack on a diagonal half of the room, indicated by a large red area. A hand will spawn in the area that the boss intends to attack as a good indication of where the player should move. If the player is hit by this AoE it will deal 50% of the player's maximum Health.
- Marei Hrul of Scorching Peaks: Spawns a wall of fire that moves from one side of the room to the other. A blue crystal will spawn in a random spot in the room which will block part of the wall of fire, leaving a small gap in the wall where there is no fire. The player can stand in this area or on the blue crystal itself to avoid the flames. If the flames hit the player it will deal 50% of their maximum Health.
On rare occasions bosses may not activate if the player hits them. It seems to be caused by attacking before the bosses activate their initial buff. The player may have to forcefully log off or exit the challenge to fix this problem.
High Sage Esher (Rooms 27 and 36)[ | ]


High Sage Esher.
This boss is encountered in rooms 27 and 36. Upon starting the challenge an untargetable and immune version of High Sage Esher will spawn, along with a Mysterious Chest located at the entrance of the room. The chest cannot be damaged and must be pushed to High Sage Esher. Shortly after the challenge starts, 2 Celestial Dragonguards will spawn and attack the player. Killing these Dragonguards will cause them to drop 1 Dragonguard's Weapon each. These weapons can be used on the Mysterious Chest to push it forward, either by right-clicking on the item in the inventory or clicking the on-screen prompt. The Dragonguards will continuously spawn.
After the Mysterious Chest has been pushed to High Sage Esher, the real version of him will spawn and can be damaged. 8 Male and Female Sages will also spawn and begin to attack the boss as well. On occasion the boss may cast an AoE skill indicated by a red circle on the ground, which will knock the player into the air. Once the boss reaches 50% Health, he will cast an attack that kills all of the Sages. 8 Golden Sages will spawn around the room in their place but will not attack the boss. Once High Sage Esher reaches a low amount of Health, he will become immune to damage and the 8 Golden Male and Golden Female Sages will begin to attack the player instead of the boss. The player must kill all of the Golden Sages to remove High Sage Esher's immunity.
Once all of the Golden Sages have died, High Sage Esher will go into a frenzy and buff himself with a physical attack and attack speed buff for a short time. Golden orbs will spawn around the room that will heal the player back to full Health. The player must have their effects settings set to the maximum option to be able to see the orbs. Eventually the buffs will wear off allowing the player to finish off the boss.
Bodhi of Grief (Rooms 45 and 54)[ | ]

The Bodhi of Grief, surrounded by several seeds.
This boss is encountered in rooms 45 and 54. Upon attacking the Bodhi of Grief he will slowly move towards the player while dealing a low amount of magic damage. With each hit the amount of damage will begin to increase. Standing within the golden aura surrounding the boss will deal a great amount of damage to the player. He will also buff himself making it impossible for the player to damage him.
Throughout the room several seeds will spawn. The player must have their effects settings set to at least the second-lowest option to be able to see the seeds. There are 3 different kinds of seeds which will do various effects on the Bodhi of Grief if the player pulls him into them:
- Blue Seed: This is known as the Seed of Life. If Bodhi of Grief absorbs this, it will restore his Health over time.
- Black Seed: This is known as the Seed of Death. If Bodhi of Grief absorbs this, it will weaken him and increase the damage he takes.
- Purple Lightning Seed: This is known as the Seed of Power. If Bodhi of Grief absorbs this, he will no longer be immune for a period of time.
If a Seed of Power is activated, the boss will stop moving and the player will be able to damage the boss. The golden aura will also be disabled, allowing melee classes to attack the boss without being harmed. After a short time, the player will be warned through an on-screen message that the Bodhi of Grief is about to recover. Once the boss has recovered he will begin to move again, the golden aura will be able to deal damage again, and the amount of magic damage dealt to the player will be reset to its lowest amount.
On occasion, the Bodhi of Grief will cast a skill named the Wave of Destruction. He will always cast this skill after he recovers from a Seed of Power. A red rectangle will appear on the ground facing towards the player, indicating the range of the attack. The size of the rectangle can vary. Standing in the range of the attack will deal a considerable amount of damage to the player. Any seeds that are in the range of the attack will also be activated, meaning that the player can strategically position the attack to activate particular seeds.
Matreya the Corrupt (Rooms 63 and 72)[ | ]
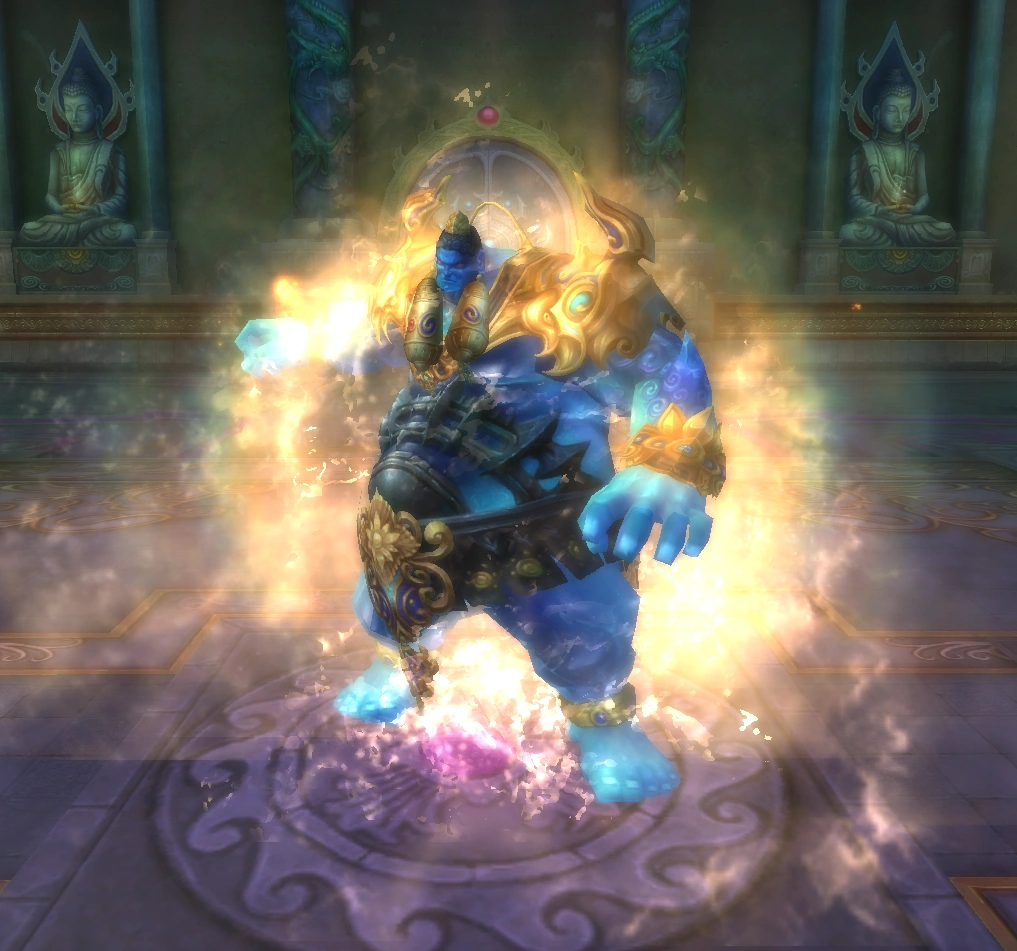

Matreya the Corrupt.
This boss is encountered in rooms 63 and 72. Matreya the Corrupt will immediately attack the player upon beginning the challenge. He will deal physical damage to the player at melee range. On occasion he will also deal additional damage and knock the player backwards or even into the air. Eventually Matreya the Corrupt will stop and a red circle will spawn around him that the player must not stand in. If the player is standing in the red circle after a few seconds the challenge will fail though the player will not die as a result. After he has used this attack a blue orb named the Ocean Crystal will spawn. The player must have their effects settings set to at least the second-lowest option to be able to see the orb. The Ocean Crystal will heal the player back to full Health if they stand in it.
Once Matreya the Corrupt dies, flowers will spawn around one side of the room. They are all named Soul Container 1 through 15. Matreya the Corrupt has hidden his soul in one of these Soul Containers, and will only give the player 4 chances to find his soul. If the player cannot find his soul successfully, then he will respawn, essentially starting the challenge over from the start.
Upon killing a Soul Container, the player will either find Matreya's soul and complete the challenge, or it will speak in normal chat. It can either say "I feel there is a great energy in the Seal which is larger/smaller than me!" or "(The Soul Container seems to be pointing north/south...)". The dialogue alternates between updates. It serves as a hint for where Matreya's soul is located. If the Soul Container says "larger" or "smaller", it means that Matreya's soul is located in the Soul Container with either a larger or smaller number assigned to its name. If the Soul Container says "north" or "south", it means Matreya's soul is located in a Soul Container located north or south of the container that was killed. The player can check directions by using their minimap.
The easiest way to find Matreya's soul without using up all 4 chances is to start by killing Soul Container 8, in the middle of the room, and then move on to the container in the middle of the containers to the north or south of the room, depending on the container's dialogue. A step-by-step to doing this is as follows:
- If Soul Container 8 says "larger" or "south", kill Soul Container 12.
- If Soul Container 12 says "larger" or "south", kill Soul Container 14.
- If Soul Container 14 says "larger" or "south", Matreya's soul is hiding in Soul Container 15.
- If Soul Container 14 says "smaller" or "north", Matreya's soul is hiding in Soul Container 13.
- If Soul Container 12 says "smaller" or "north", kill Soul Container 10.
- If Soul Container 10 says "larger" or "south", Matreya's soul is hiding in Soul Container 11.
- If Soul Container 10 says "smaller" or "north", Matreya's soul is hiding in Soul Container 9.
- If Soul Container 12 says "larger" or "south", kill Soul Container 14.
- If Soul Container 8 says "smaller" or "north", kill Soul Container 4.
- If Soul Container 4 says "larger" or "south", kill Soul Container 6.
- If Soul Container 6 says "larger" or "south", Matreya's soul is hiding in Soul Container 7.
- If Soul Container 6 says "smaller" or "north", Matreya's soul is hiding in Soul Container 5.
- If Soul Container 4 says "smaller" or "north", kill Soul Container 2.
- If Soul Container 2 says "larger" or "south", Matreya's soul is hiding in Soul Container 3.
- If Soul Container 2 says "smaller" or "north", Matreya's Soul is hiding in Soul Container 1.
- If Soul Container 4 says "larger" or "south", kill Soul Container 6.
If the player successfully finds Matreya's soul, the challenge will be complete.
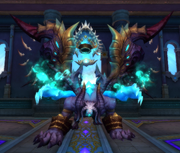
Zen Ji, The Serpent Witch (Rooms 81 and 90)[ | ]


Zen Ji, the Serpent Witch.
This boss is encountered in rooms 81 and 90. Shortly after attacking Zen Ji, the Serpent Witch, a Mysterious Snake Egg will appear near her. If the player kills the egg in time, then it will spawn 2 Stunted Snake Hatchlings. If it is not killed in time then 2 Mature Snake Hatchlings will spawn instead which have more health than stunted hatchlings. Regardless of which hatchlings spawn, the player must kill them before they can fully mature or they will fully heal Zen Ji back to full health.
Some time afterwards, an on-screen message will appear saying "Zen Ji is unleashing a devastating attack!" and she will debuff the player, lowering their physical or magic defenses. This debuff will wear off on its own after a short time and can be purified. At the same time, a Topaz Servant and Emerald Servant will spawn. These two monsters will occasionally deal magic damage to the player. They do not need to be killed however multiple of them can spawn if the battle lasts long enough which may overwhelm the player.
The boss will rotate between spawning Mysterious Eggs, debuffing the player, and spawning servants repeatedly throughout the battle.
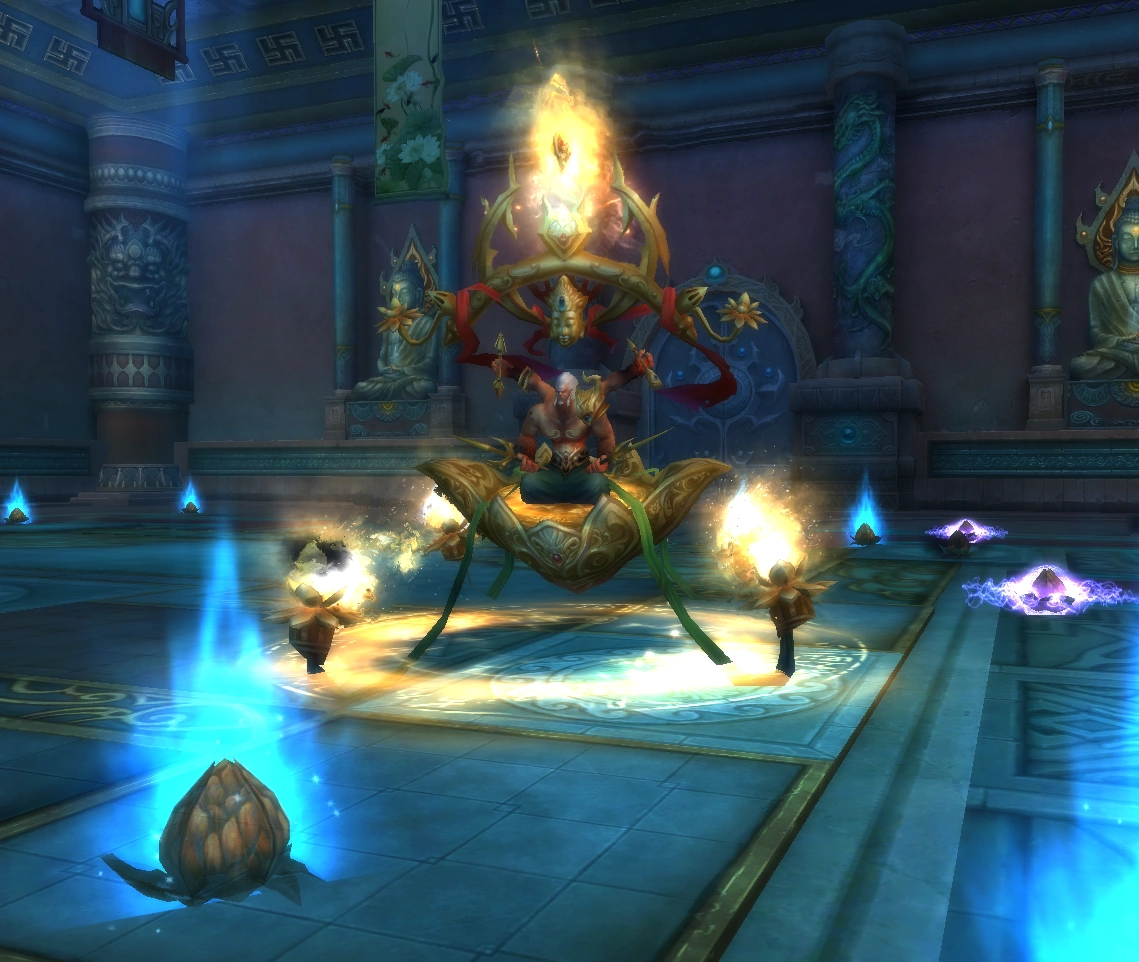
Mara Papman (Rooms 99 and 108)[ | ]

Mara Papman in the second phase of the challenge.
This boss is encountered in rooms 99 and 108. There are two phases of this boss fight. In the first phase, Mara Papman cannot be targeted and is therefore immune to damage. A green orb named the Soul Prison will appear in front of him, and 4 Adventurers will appear on the opposite side of the room. The objective of this phase is to attempt to save all 4 Adventurers from being killed by Mara Papman. The amount of Adventurers that survive in the first phase will determine how strong Mara Papman is in the second phase. The player can let all Adventurers die however it will mean that the boss will fight with its full power.
During this phase, a copy of Mara Papman will appear behind every Adventurer and execute them, damaging them for 2.5 million health each and will do this repeatedly. The player can run to the green Soul Prison to spawn a monster named Mara Papman's Soul. Once the player damages the soul to below 80% health, it will whisper to the player "I can only help you for 20 seconds! Go, save the adventurers" and grant the player with a buff that increases their attack speed to the maximum (5.0 attacks per second) and heal any target they melee attack. If the player melee attacks the Adventurers, they will gain health. Attacking them with skills do not heal them. Once the buff wears off the Soul Prison will spawn again allowing the player to repeat this process. The player should keep an eye on each Adventurer's health to make sure they are not in danger of being killed. When an Adventurer is at full health they will disappear while thanking the player, and they are considered to be saved.
The second phase will begin when the Adventurers have died or been saved, or after enough time has passed. At this point Mara Papman will reappear in a slightly altered form and the player will be able to attack him. An on-screen message will appear notifying the player of the level of his Oblivion skill depending on how many Adventurers were saved. The player should position themselves around the Soul Prison area when killing the boss as they can still take advantage of Mara Papman's Soul during the battle. If the player damages the soul to below 80% health, it will whisper to the player "I will use my energy to shield you from Oblivion, but my power will only last for 20 seconds!" and constantly heal the player during this time.
During the battle, an on-screen message will appear warning the player that Mara Papman will cast Oblivion in 10 seconds, and then 5 seconds. Once he begins casting Oblivion, he will float in the air and blast the player repeatedly with orbs for 15 seconds, dealing physical damage. The player can use Mara Papman's Soul to constantly heal themselves during Oblivion, or they can use physical immunity skills such as Expel. Oblivion will deal more damage to the player if they did not save all 4 Adventurers.
Rewards[ | ]
Every room has a single reward upon completion which is randomly chosen. In regular levels the player can choose one reward, which can be an EXP orb which is redeemed automatically, or a War Avatar Order. In boss levels the player can choose two rewards, which can vary from War Avatar Cards to Star Chart items and more.
| Rooms 1-8 | Room 9 | Rooms 10-17 | Room 18 | ||||||||
|---|---|---|---|---|---|---|---|---|---|---|---|
| Item | Quantity | Chance | Item | Quantity | Chance | Item | Quantity | Chance | Item | Quantity | Chance |
| 1 | 49% | 60 | 2.5% | 1 | 30% | 90 | 2.5% | ||||
| 1 | 30% | 100 | 2.5% | 1 | 20% | 150 | 2.5% | ||||
| 1 | 6% | 6 | 12.5% | 1 | 20% | 7 | 12.5% | ||||
| 1 | 5% | 1 | 5% | 1 | 10% | 4 | 5% | ||||
| 1 | 4% | 1 | 25% | 1 | 8% | 1 | 25% | ||||
| 1 | 3% | 4 | 12.5% | 1 | 6% | 5 | 12.5% | ||||
| 1 | 2% | 1 | 25% | 1 | 4% | 1 | 25% | ||||
| 1 | 1% | 12 | 15% | 1 | 2% | 14 | 15% | ||||
| Rooms 19-26 | Room 27 | Rooms 28-35 | Room 36 | ||||||||
|---|---|---|---|---|---|---|---|---|---|---|---|
| Item | Quantity | Chance | Item | Quantity | Chance | Item | Quantity | Chance | Item | Quantity | Chance |
| 1 | 20% | 5 | 12.5% | 1 | 20% | 6 | 20% | ||||
| 1 | 40% | 1 | 5% | 1 | 25% | 1 | 5% | ||||
| 1 | 25% | 5 | 12.5% | 1 | 25% | 6 | 12.5% | ||||
| 1 | 5% | 1 | 20% | 1 | 10% | 1 | 30% | ||||
| 1 | 4% | 5 | 12.5% | 1 | 8% | 50 | 25% | ||||
| 1 | 3% | 1 | 15% | 1 | 6% | 7 | 2.5% | ||||
| 1 | 2% | 1 | 20% | 1 | 4% | 7 | 2.5% | ||||
| 1 | 1% | 180 | 2.5% | 1 | 2% | 14 | 2.5% | ||||
| Rooms 37-44 | Room 45 | Rooms 46-53 | Room 54 | ||||||||
|---|---|---|---|---|---|---|---|---|---|---|---|
| Item | Quantity | Chance | Item | Quantity | Chance | Item | Quantity | Chance | Item | Quantity | Chance |
| 1 | 20% | 7 | 15% | 1 | 20% | 10 | 20% | ||||
| 1 | 35% | 2 | 10% | 1 | 25% | 2 | 20% | ||||
| 1 | 25% | 7 | 12.5% | 1 | 25% | 1 | 5% | ||||
| 1 | 8% | 1 | 7.5% | 1 | 10% | 2 | 5% | ||||
| 1 | 6% | 50 | 20% | 1 | 8% | 1 | 12.5% | ||||
| 1 | 3% | 8 | 12.5% | 1 | 6% | 10 | 12.5% | ||||
| 1 | 2% | 8 | 10% | 1 | 4% | 1 | 20% | ||||
| 1 | 1% | 1 | 12.5% | 1 | 2% | 2 | 5% | ||||
| Rooms 55-62 | Room 63 | Rooms 64-71 | Room 72 | ||||||||
|---|---|---|---|---|---|---|---|---|---|---|---|
| Item | Quantity | Chance | Item | Quantity | Chance | Item | Quantity | Chance | Item | Quantity | Chance |
| 1 | 20% | 10 | 20% | 1 | 20% | 10 | 15% | ||||
| 1 | 25% | 3 | 10% | 1 | 25% | 2 | 15% | ||||
| 1 | 25% | 1 | 10% | 1 | 25% | 1 | 12.5% | ||||
| 1 | 10% | 2 | 12.5% | 1 | 10% | 2 | 12.5% | ||||
| 1 | 8% | 1 | 12.5% | 1 | 8% | 1 | 12.5% | ||||
| 1 | 6% | 10 | 12.5% | 1 | 6% | 10 | 12.5% | ||||
| 1 | 4% | 2 | 17.5% | 1 | 4% | 3 | 15% | ||||
| 1 | 2% | 2 | 5% | 1 | 2% | 2 | 5% | ||||
| Rooms 73-80 | Room 81 | Rooms 82-89 | Room 90 | ||||||||
|---|---|---|---|---|---|---|---|---|---|---|---|
| Item | Quantity | Chance | Item | Quantity | Chance | Item | Quantity | Chance | Item | Quantity | Chance |
| 1 | 20% | 12 | 17.5% | 1 | 20% | 12 | 15% | ||||
| 1 | 25% | 4 | 15% | 1 | 25% | 4 | 12.5% | ||||
| 1 | 25% | 2 | 5% | 1 | 25% | 2 | 10% | ||||
| 1 | 10% | 3 | 12.5% | 1 | 10% | 3 | 12.5% | ||||
| 1 | 8% | 2 | 12.5% | 1 | 8% | 2 | 12.5% | ||||
| 1 | 6% | 1 | 12.5% | 1 | 6% | 1 | 12.5% | ||||
| 1 | 4% | 1 | 12.5% | 1 | 4% | 1 | 12.5% | ||||
| 1 | 2% | 1 | 12.5% | 1 | 2% | 1 | 12.5% | ||||
| Rooms 91-98 | Room 99 | Rooms 100-107 | Room 108 | ||||||||
|---|---|---|---|---|---|---|---|---|---|---|---|
| Item | Quantity | Chance | Item | Quantity | Chance | Item | Quantity | Chance | Item | Quantity | Chance |
| 1 | 20% | 12 | 15% | 1 | 20% | 3 | 17.5% | ||||
| 1 | 25% | 4 | 12.5% | 1 | 25% | 5 | 15% | ||||
| 1 | 25% | 2 | 10% | 1 | 25% | 5 | 7.5% | ||||
| 1 | 10% | 3 | 12.5% | 1 | 10% | 3 | 7.5% | ||||
| 1 | 8% | 2 | 12.5% | 1 | 8% | 1 | 7.5% | ||||
| 1 | 6% | 1 | 12.5% | 1 | 6% | 1 | 15% | ||||
| 1 | 4% | 1 | 12.5% | 1 | 4% | 1 | 15% | ||||
| 1 | 2% | 3 | 12.5% | 1 | 2% | 1 | 15% | ||||
Experience Rewards[ | ]
Below are the experience and spirit values that you will receive depending on the type of EXP orb you get from non-boss levels. When receiving an EXP orb, you will automatically receive a quest that will award you with experience and spirit. The amount of experience and spirit that you get will be lower if you are below level 100, and the amount will depend on your current level. If you are below level 100 and reawakened, the amount of experience you receive will be multiplied by 4 if you have reawakened once, or multiplied by 3.5 if you have reawakened twice. The amount can also be increased with the use of Ancient Gifts or other items that can increase experience or spirit from quest rewards.
| Level of Essence | Experience (at level 100) | Spirit (at level 100) |
|---|---|---|
| 1 | 100,000 | 20,000 |
| 2 | 200,000 | 40,000 |
| 3 | 300,000 | 60,000 |
| 4 | 400,000 | 80,000 |
| 5 | 500,000 | 100,000 |
| 6 | 600,000 | 120,000 |
| Level of Essence | Experience (at level 100) | Spirit (at level 100) |
|---|---|---|
| 1 | 700,000 | 140,000 |
| 2 | 800,000 | 160,000 |
| 3 | 900,000 | 180,000 |
| 4 | 1,000,000 | 200,000 |
| 5 | 1,260,000 | 252,000 |
| 6 | 1,500,000 | 300,000 |
| Level of Essence | Experience (at level 100) | Spirit (at level 100) |
|---|---|---|
| 1 | 1,760,000 | 352,000 |
| 2 | 2,000,000 | 400,000 |
| 3 | 5,000,000 | 1,000,000 |
| 4 | 10,000,000 | 2,000,000 |
| Dungeons | |
|---|---|
| The Midlands |
|
| Call to Duty | |
| Lothranis and Momaganon |
|
| Morai | |
| Primal World | |
| Celestial Vale | |
| The Western Steppes | |