
Dawnlight Halls is a dungeon located in the Western Steppes and it is where the secret organization Future of Mankind Initiative (FMI) performed their inhumane experiments. It is available for players that have reached level 103, Twilight Sky I and have unlocked their Chaotic Soul Cultivation. Through this dungeon, players can farm Glyphs, Rank 8 recast materials and harvesting materials for the Homestead.
Completing Dawnlight Halls in Deicide or Judgment Mode has a 70% chance to spawn the Mysterious Merchant, an NPC that sells items such as materials for Dragonbreath Weapons and Glyph Packs in exchange for gold or Silver Coins.
Story
This secret organization was created to research the dark arts of augmentation. Below their mysterious leader are powerful priestesses: Letitia, who exploits astrology to manipulate the weak-minded; Frederica, who is in charge of growing augmentations; and Sibastiana, who defends their organization against spies and intruders. The FMI is made up of powerful mages who settled down in a deep valley, in a fortress known as the Dawnlight Halls. Though they live together with the Changelings, they are protected by a potion of their own invention. Because the members of FMI cannot be replicated, the Changelings have never been entirely trusting of them. Whether this fragile truce will be maintained or shattered remains to be seen...
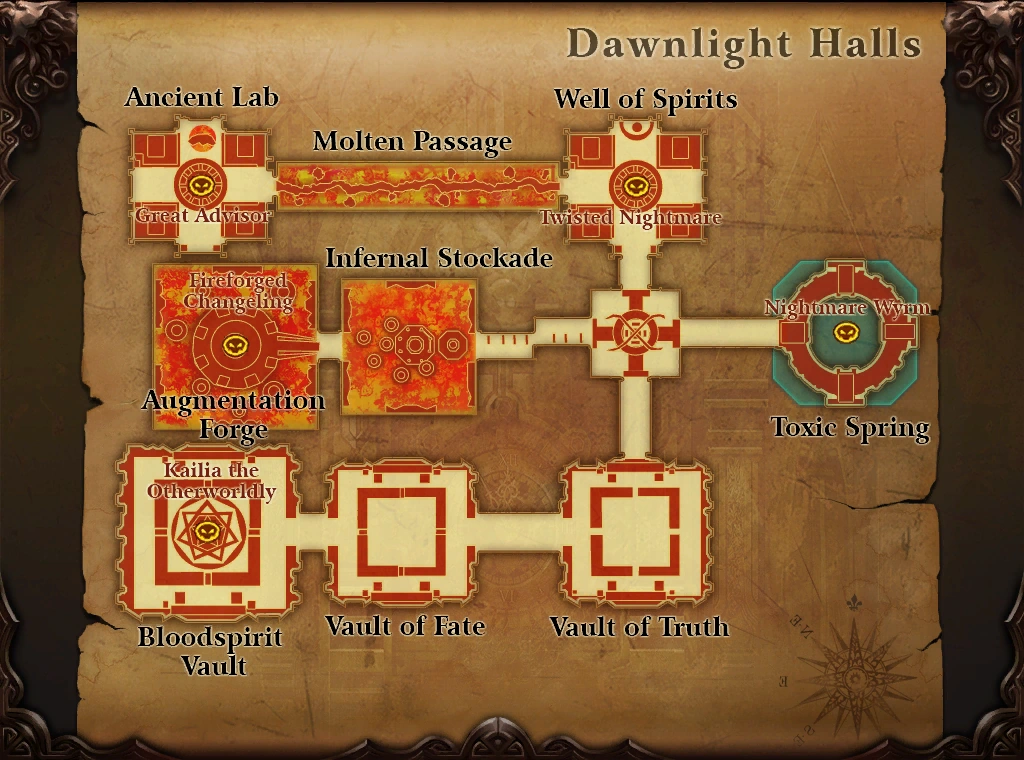
Map
Overview
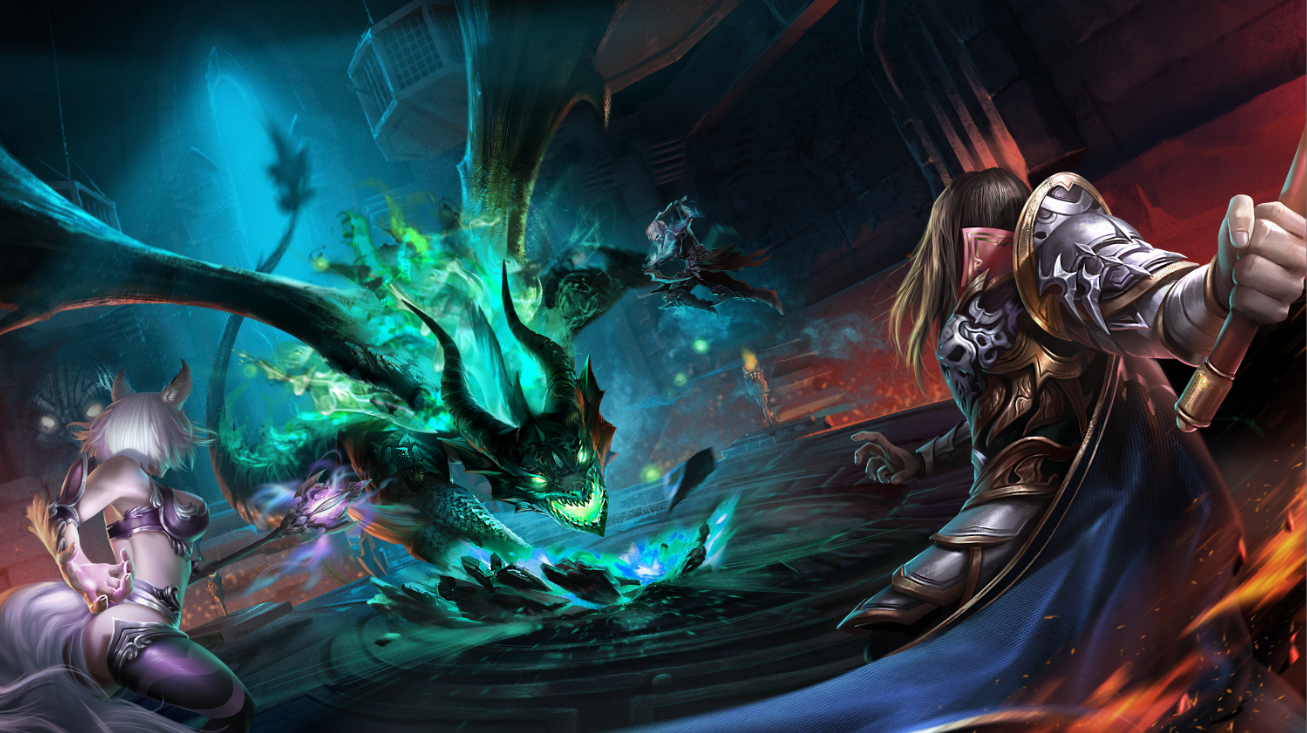
Artwork of the Dawnlight Halls.
Players that meet the dungeon requirements will need a Dawnlight Feather item to enter. Dawnlight Feathers can be picked from the NPC outside Dawnlight Halls. A player can initially pick five Dawnlight Feathers, and then can pick one daily Dawnlight Feather after completing the Western Steppes quest line up to the "Dawnlight Assault" point.
Dawnlight Halls is made up of four different paths, each with their own bosses:
- Infernal Stockade (Cages/Lava path)
- Toxic Spring (Wyrm/Colors path)
- Clockwork Vaults (Dice path)
- Ancient Lab/Well of Spirits (Final path)
Squads will only have to complete three of these halls. Upon entering, only one of the paths will be open - the Toxic Spring. Once the boss of the Toxic Spring, Nightmare Wyrm, has been killed, they will drop a Dawnlight Crystal. Back at the main entrance, one of the doors will have its seal removed and can be opened by digging the bottom of the door. The path that opens is random. Once players have completed the second path, the boss for that path will also drop a Dawnlight Crystal and then the Ancient Lab/Well of Spirits, the final path, can be opened by digging the bottom of the door. Previously players were required to do the first three paths in any order and then the final path, however this was changed from the Neverfall Content Update.
There are 3 difficulties:
- Normal
- Deicide
- Judgment
The leader of the squad will have to finish a run in Normal mode before they can activate Deicide mode. Likewise, the leader has to have finished a run in Deicide mode before they can activate Judgment mode.
Normal mode is not very demanding gear wise. The bosses do average damage, unless you are tanking them, and it is easy to survive as long as you know what to do. Deicide mode will and Judgment mode will be more challenging, but also more rewarding in terms of drops.
Squad Structure
A Dawnlight Halls squad will need the following:
- A tank: Barbarian, Seeker or a well geared player, the Venomancer pet Celestial Giant can also tank some of the bosses
- Debuffers: Blademaster, Seeker, Stormbringer, Venomancer
- Ranged Damage Dealers: Archer, Psychic, Wizard
- Melee Damage Dealers: Assassin, Duskblade
- Healers: Cleric, Mystic
Weekly Quest
Players can use 6 Dawnlight Feathers to receive a weekly quest named Dawnlight Falls (W) from Archmage Conrad inside Dawnlight Halls. The quest requires you to kill Nightware Wyrm, the first boss, and Natya Veda, the Great Advisor, the final boss. These bosses can be killed in any mode.
Completing this quest will give the following rewards:
- Glyph Pack Lv2 x10
- Neverfall Squire's Badge x10
- Nebula Dust Orb x4
Colors Path

Colored circles in the Toxic Spring.
Once activated, four colored circles will appear on the ground (red, green, blue, yellow) and colored fairy monsters will spawn. The goal is to bring each fairy to the right color circle and kill the fairy within said circle. It is very important not to use AoE attacks as you can potentially kill the fairies other players are luring to their respective circles.
- Desert fairy = Yellow circle
- Ocean fairy = Blue circle
- Magma fairy = Red circle
- Forest fairy = Green circle
- Snow fairy = Any circle
This process lasts 5 minutes or until 1000 points have been gathered overall or 100 fairies have been killed. Each color starts with 500 points and gains 10 points per fairy killed. Fairies killed outside the circles do not count. Players will get a warning 30 seconds before time is up. After that, a platform will appear in the middle of the room and the boss will land. Players have 5 seconds to run to the middle of the platform. If they stand near the edge, they will be killed by the fire.
The amount of points that were accumulated during the fairy killing process will determine how much time players have to attack the boss until the boss will fly up again, as points will begin to drain. If players stand within the outlines of the colored circles, then points will drain slower. It is recommended that players attempt to stand in the overlaps of the circles so that they are standing in two circles rather than one. The maximum amount of time Nightmare Wyrm will stay down is 30 seconds.
Sometimes the boss will shout "In X seconds, player X will be defeated!" and do a cone-shaped AoE around the respective player that pushes them, and everyone in range, back. Stay close to the boss to avoid being pushed into the flaming area.
When time is up, there will be a 10 second countdown during which players will have to run back to the edges. After countdown is over, the middle platform will disappear again and whoever is on it will fall into the pit and die. Players that have died in the pit cannot be resurrected by clerics, however will be able to return to the area if they town portal.
Once the platform is gone, the fairies will re-appear and players will have to accumulate points again. This routine has to be repeated until the boss is dead.
Deicide Mode
Poison pools will spawn and players will have to run around them as to avoid killing the fairies in them. Dark Night Fairies will sometimes spawn and try to erode points so they must be killed quickly, outside the circles. The boss has higher HP.
Judgment Mode
Poison pools will spawn and players will have to run around them as to avoid killing the fairies in them. Dark Night Fairies will sometimes spawn and try to erode points so they must be killed quickly, outside the circles. The boss will also reel players at specific intervals. A warning 5 seconds before the reel, players will receive the "Watch out!" warning. Players will have to stand at the outer edge of the platform to avoid being reeled into the pit. The boss has higher HP.
Tips
- When running on and off the platform, try to be as quick as possible. Rubberbanding is a huge problem here so be very careful. A double jump sometimes helps, if you are airborne while the well lid disappears you won't fall.
- The boss will attack whoever has aggro the entire time, so it's best to try and let a tank or healer class take aggro if possible.
Cages Path
The first room is full of cages on which players will have to jump. The floor of the room is filled in lava and falling there will cause immediate death.
The goal of this room is to kill the flying boss while jumping on the cages, avoiding the lava from down below and any other lethal obstacles. Ranged classes are required for this boss as melee classes cannot reach it. The cages will start turning red, killing whoever stands on them. Players will have to quickly kill the monsters that spawn and avoid falling into the lava. Failing to do either of these will cause the lava's level to rise, killing everyone. Once the flying boss is dead, players can move to the next room.
Reforged Changeling

The Reforged Changeling.
As the boss' HP starts going down, he will spawn a monster called Cursed Shambler on the edge of the platform which has to be killed fast to prevent the lava from rising.
The boss does a cone-shaped AoE which kills any non-barbarians caught in it. Smaller lethal AoE circles will spawn as well. The boss will sometimes do a push-back and warn players with the message "Get close to the center of the platform or you will be defeated down below!". Players will have to run close the center of the platform to avoid getting pushed into the lava. Standing in front of an obstacle also works. Another message to look out for is the "Players have been cursed, gather quickly to defend!". A player at random will be cursed and killed within a few seconds. To avoid this, everyone will have to run at the center. If not enough players gather, all the players around the cursed player will be killed. If all players stay separated, only the cursed player will be killed. It is not known which player is cursed, however quite often it is the barbarian that is tanking the boss.
After a certain point, the boss will disappear and players will be asked to kill "Purgatory Traps". Players will have to jump on the small platforms around the room and kill all the Lava Triggers as soon as possible. The Lava Triggers have a buff that reduces damage taken from range so players have to stand in melee range to deal damage to them. If players fail to kill the Lava Triggers in a timely manner, the lava will rise and kill everyone.
Deicide Mode
The Reforged Changeling has higher HP and spawns Fire Elementals that recover its HP.
Judgment Mode
The Reforged Changeling has higher HP and spawns Fire Elementals that recover its HP. Fire Elementals that reach the center also raise the lava level.
Dice Path
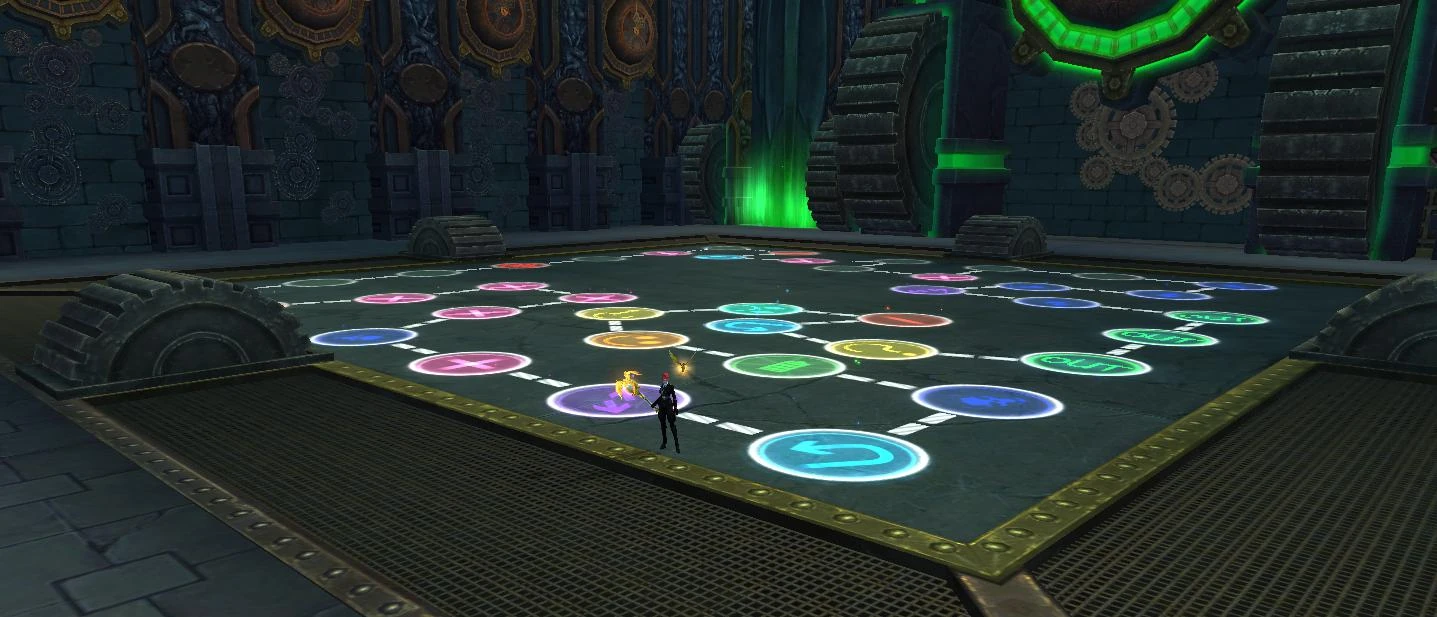

The board in the Vault of Truth.
The first room is full of "question mark" monsters. Killing them reveals the symbols on the game board. Once all the "?" are killed, the board will activate and you can move on to the next room. The goal of the second room is to get the little robot to move across the board by spinning the big die in the middle of the room.
Once you start, a quest will appear that tracks your progress:
- Energy (starts at 10,000): determines how much HP the final boss will have. The more energy you have at the end, the less HP boss will have
- Battery (0/1): required to finish the puzzle
- Turns: the amount of turns the robot has to move across the board (nothing happens when it hits 0)
Each symbol on the board has a different effect when you trigger them (when the robots walks on them):
- IN = starting point
- OUT = end point
- + = adds energy
- - = removes energy
- Happy face = increases the amount of energy gained and prevents the loss of energy from - spots
- Sad face = increases the amount of energy drained and the reduces the energy gain from + spots
- ? = makes the robot advance (random number between 1 and 6)
- ⇆ = causes all the + and - on the board to reverse
- ⮎ = changes the robot's movement direction
- Skull = spawns mobs that you have to kill quickly and drains energy; the longer you take, the more energy is drained
- Battery = the goal of the game; need to collect in order to finish the game
Attacking the big die will spawn three smaller dice in each side of the board. Each smaller die gives a direction (Up or Right). Killing the small die will make the big die turn in the given direction. Killing small Die: Up makes the big die turn upwards and killing small Die: Right makes the big die turn to the right. The final number you get after killing the last small die will be the number of steps the robot moves on the board. Players will have to attention to the order in which they kill the dice. The number taken into account on the big die is not the one on top. It is the one on the side, towards which the red arrow points. It will also be highlighted when the die turns.
Players will always get either 1 Up and 2 Rights or 2 Ups and 1 Right for the small dice. For either of these cases there are 3 possibilities, and these are the results. The faces are named from the perspective of looking at the Front Face which is the selected face with the red arrow.
1 Up and 2 Rights
RRU = Bottom Face
RUR = Back Face
URR = Top Face
2 Ups and 1 Right
UUR = Left Face
URU = Back Face
RUU = Right Face
The game finishes when players have the battery and put the robot on the "OUT" sign. Once the puzzle is complete, players may move on to the next where boss awaits.
Dice Tips
- If you have trouble figuring out how to get a certain die roll, this tool can help you plan your rolls.
- Opposite faces always add up to 7, just like on a standard die.
- The back face is reachable in either configuration so you can plan ahead however many turns you want of flipping between the front and back faces.
- The best strategy is to calculate where the robot should move, check what directions you have available, try all possibilities and see what final numbers they give, and go with the order that is most beneficial. Make sure everyone focuses on the same die when killing them so the order isn't messed up.
- Generally it's more time efficient to go for a fast exit then to collect more energy and lower the boss hitpoints. Even if the boss has nearly double hitpoints, it won't change the boss attacks. Most parties have decent enough damage that this would mean only a few seconds of extra damagedealing.
Kailia the Otherworldly
This room has similar mechanics to the previous one, but without the game board. Once players start the boss, one of the bars on the glowing circle will disappear and players have to make the robot land on it to fix it. There will be small dice and a big die again.
Every failed attempt of getting the robot on the missing bar will give the boss a shield buff equal to 10% of the boss' HP that absorbs damage. The boss also purges and puts a debuff on every player that increases skill cool down of the next five skills, Genie skills included.
Once the robot fixes the seal, the boss heals to full HP and players have to repeat the process one more time when his HP drops to about half. After the seal is fixed once again, the boss will ask players to roll a 5+, and finally, to roll a 6. After that, its deaden buff will go away and it can be killed.
Deicide
The dice board requires two batteries instead of one. The boss does a cone-shaped attack that kills players. The cone always travels clockwise around the boss and is not related to player aggro. The boss has higher HP and the shield buff is equal to 20% of the boss' HP.
Judgment
The dice board requires four batteries instead of two. The boss does a cone-shaped attack that kills players. The cone is random and is not related to player aggro. The boss has higher HP and the shield buff is equal to 20% of the boss' HP.
Final Path
After completing the other paths, the seal to the final path will be gone, and the door can be opened. Previously there was a trial and a boss for this final path before the final boss, however since the Neverfall Content Update part of this has been removed.
The player that collects the Dawnlight Crystal should dig the bottom of the door to open it. There will be another door blocking the way into the next room, however it should not be opened yet. The door can be bypassed by jumping through the gap at the top of it, which can be accessed by jumping on the large circular part in the middle of the door first, and then jumping up onto the gap. All squad members except one (this can be anyone, not just the squad leader) should jump over this door and then make their way to the Molten Passage which can be found to the left of the room.
Molten Passage
This passage is simply a path of floating rock, with multiple Death Wards along it. Standing in the aura of the Death Ward will kill you. There is lava below that will kill players if they fall in. Squad members should gain full Chi for this part and get ready to attack the first Death Ward. One squad member should have stayed behind at the door at the entrance of this part of Dawnlight Halls. Once everyone is ready, this player should then dig the door to begin the trial and quickly make their way to the rest of the squad.
The Twisted Nightmare will appear in the center of the room just before the Molten Passage, covered in a lethal mist that kills any players caught in it. He is invulnerable and will chase the squad through the Molten Passage. Players will have to rush to the next door, through the Molten Passage, to avoid dying.
Ranged classes will have to kill the Death Wards to advance through the passage. Some Guardian Statues will spawn and make their way down the passage towards the squad. They can push players back, possibly off the bridge and into the lava, killing them. They will whisper the player they are going to push and there will be an arrow indicating the direction of the push, so it is possible to plan where you will be pushed if you act quickly. At the end of the path, the FMI Summoner will be waiting and has to be killed to advance to the next room.
If the players fail to complete this part, they can restart it by digging the door at the beginning.
Tips
- If a Guardian Statue whispers to you and you are not prepared to be pushed back into a safe place, you can jump in the air and with good timing possibly be pushed upwards instead of forwards or backwards.
- If a Guardian Statue whispers to you, make sure you are not set up to be pushed into the aura of a Death Ward as this will likely kill you.
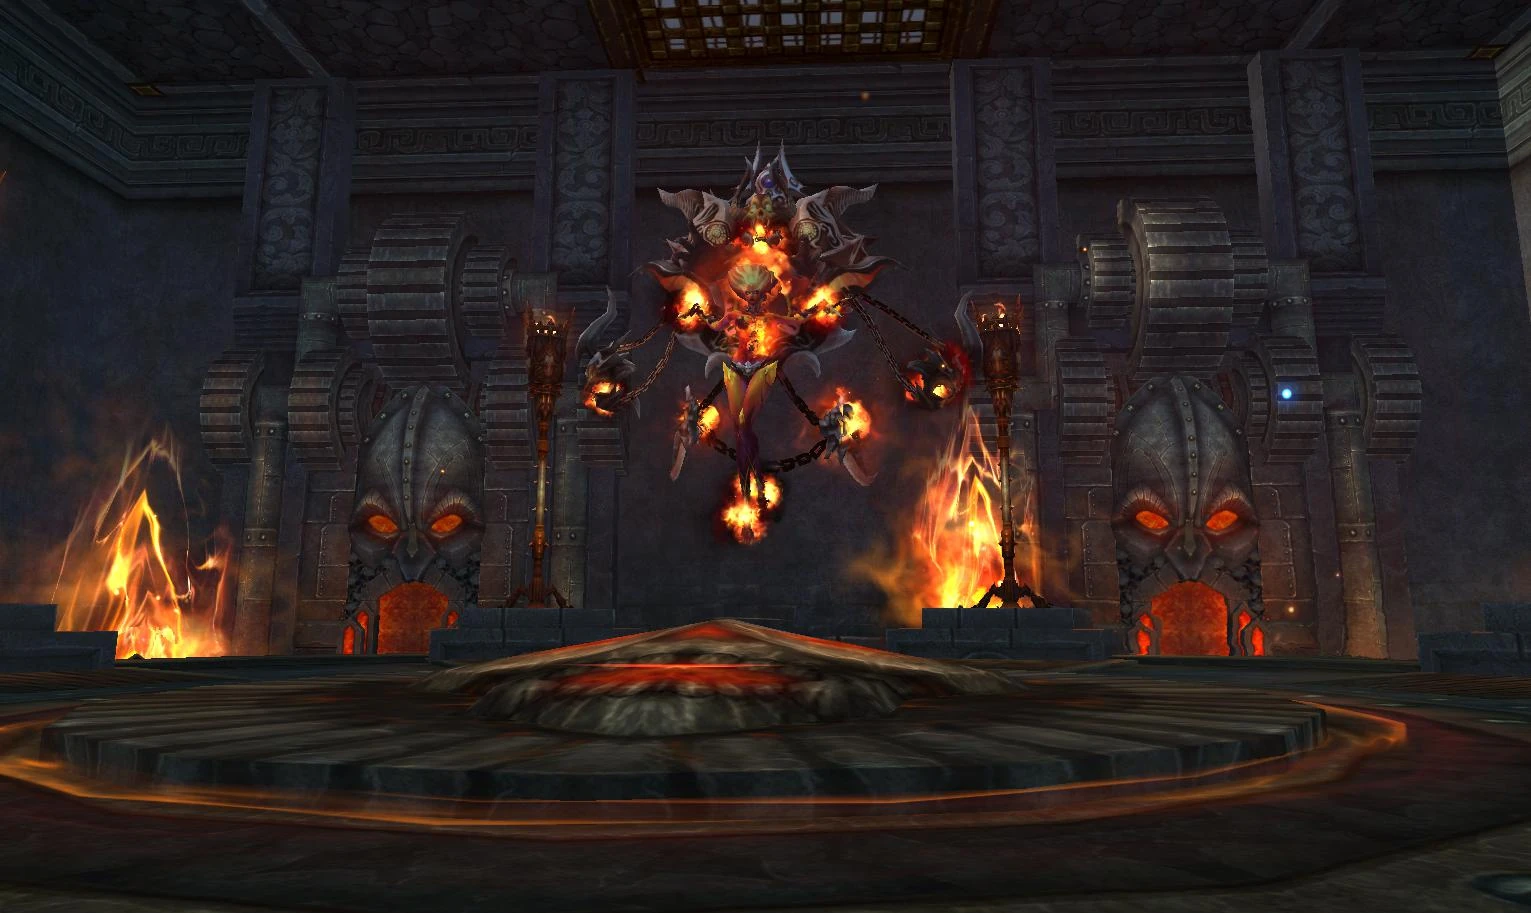
Natya Veda, the Great Advisor


Natya Veda, the Great Advisor. The final boss in the Dawnlight Halls.
The boss will spawn two portals on the sides of the room. Sacrifices will wander into the portals as an offering. Players will have to let the sacrifices walk into the portals to spawn Ritual Puppets, but once enough Ritual Puppets have been killed the sacrifices will have to be killed to avoid spawning an excess of Ritual Puppets. Killing sacrifices will spawn ghosts for 10 seconds that can kill players.
Lead three Ritual Puppets into the blue circle so they can combine to form a Soul Vessel. This Soul Vessel must be killed quickly, otherwise a much larger version of the Soul Vessel, Hummel's Will, will appear and kill everyone. Once the Soul Vessel is killed, it will drop a lantern with a shield of light that protects players from the Natya Veda's Oblivion attack. Oblivion happens at every 30% of the boss' HP. Oblivion lasts for 22 seconds, then 24 seconds, and then 30 seconds.
Deicide
The bosses will have more HP. The Soul Vessel will have a cone-shaped AOE that kills players but it can be interrupted using skills or Genie skills. Deicide gives a one time red quest to kill Natya Veda and the chest she spawns after. The quest gives you two level 3 Glyph packs.
Judgment
The bosses will have more HP. In the Molten Passage, additional monsters will spawn on the sides pushing players. The Soul Vessel will have a cone-shaped AOE that kills players but it can be interrupted using skills or Genie skills. Judgment gives a one time red quest to kill Natya Veda and the chest she spawns after. The quest gives you two level 3 Glyph packs and a title.
Videos
- Dawnlight Halls - Normal Mode
- Dawnlight Halls - Judgment Mode with guidelines
- Dawnlight Halls - Natya Veda Mechanics in Judgment Mode
External Links
| Dungeons | |
|---|---|
| The Midlands |
|
| Call to Duty | |
| Lothranis and Momaganon | |
| Morai | |
| Primal World | |
| Celestial Vale | |
| The Western Steppes |
|