
The Endless Universe, also known as Low-level Endless Universe, is an instanced dungeon located in Morai. To activate this dungeon the squad will need at least 8 squad members.
Entry[ | ]
To gain access to Endless Universe, players will need to obtain a Relic of Wonder: Weapon. One daily is obtainable from Momentor at the bottom of the pyramid east of Order of the Shroud in Morai. Entry is done at Momentor, and consumes a Relic of Wonder: Weapon.
Rewards[ | ]
There are two types of rewards from Endless Universe: daily quest rewards, and instance completion rewards.
The daily quest (requiring members to get credit for killing Ghost Wing) for Activeness Points yields 20 Fortifications Essence (see the page for Rank 8).
Additionally, as explained in the Bonus Reward section, squad members may choose between the following two rewards:
- Drunk Lotus Pill: Gives 400,000 experience and 150,000 spirit. Account stashable.
- Inconsistent Chest: Contains of the following items:
- Endless: Weapon Card (10%) - can be exchanged at Zirihk Slanh for a grade 13 Morai weapon of their choice.
- Endless: Armor Card (20%) - can be exchanged at Zirihk Slanh for a grade 13 Morai piece of armor of their choice.
- Mirage Celestone x20 (15%)
- Skypool Scriptures x8 (27.5%) - used to craft Quicksand Maze equipment
- Earthbless Tome x16 (27.5%) - used to craft Quicksand Maze equipment
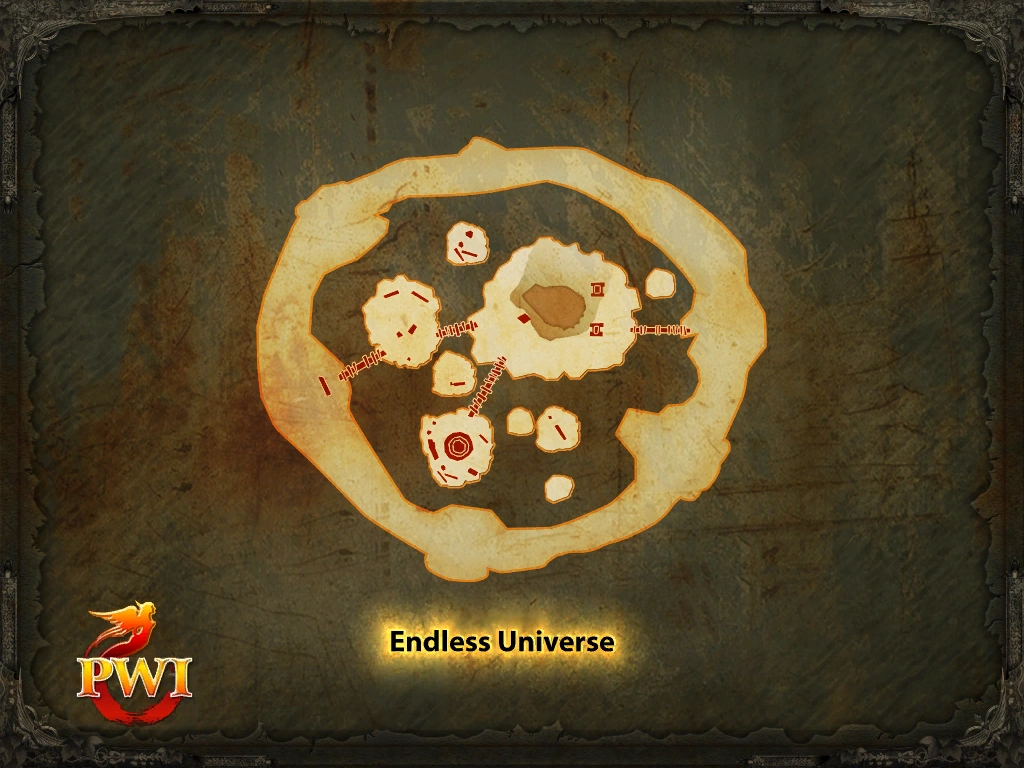
Map[ | ]
Phase 1: Delivering the Gems[ | ]
The first phase of Endless Universe is similar to a relay race, where each member of the squad must run a part of the dungeon. There must be at least 8 squad members to do this part, but 10 is ideal. The squad should make sure to have a cleric and some ranged DDs present. If 10 different classes are in the dungeon, the squad leader can take the "Unity is Strength" quest from Wade Slanh to grant all squad members a double damage buff which will stack with the other double damage buff available in the dungeon.
Upon entering the dungeon, players will see 10 different gems, which are also referred to as lanes. There are 8 gems in a circle named after the letters of the Greek alphabet, which cover each portion of the relay race, and each must be covered by a squad member. The remaining 2 gems in the middle can only be used if there are 9 or 10 squad members and are used to assist the remaining 8 squad members during their portion of the relay race. Each lane contains different sets of monsters, with some lanes more suitable for certain classes; however, it is possible for any class to complete any portion of the relay race. The gem each member chooses should be chosen before beginning the dungeon: members will typically choose by standing on their desired gem.
The 8 main gems are the following:
- Alpha: Contains flying ranged physical mobs. This lane is most suitable for archers or other ranged classes that can handle physical damage.
- Beta: Contains melee physical mobs that buff their physical attack. This lane is suitable for any class that can handle physical damage, and is a decent lane for newer players to try out.
- Gamma: Contains melee physical mobs that slow the player's movement speed to 0.1m/s. This lane is suitable for classes that can become immune to movement debuffs such as blademasters, barbarians, and assassins. It is also suitable for classes that can purify themselves with skills or the purify effect on magic weapons.
- Delta: Contains a large amount of melee physical mobs that buff their physical attack. This lane is suitable for classes that have many AoE skills such as duskblades, blademasters, wizards, psychics, etc.
- Epsilon: Contains mobs that debuff the player with a DoT that will kill them if not purified after 25 seconds. Each mob will only use this debuff once. This lane is suitable for any class that can purify such as clerics, psychics, venomancers with sage Summer Sprint, or seekers via Quid Pro Quo (must have a target to use, do not save it for until after the monsters are dead). It is also suitable for assassins due to their ability to build fast chi and spark constantly.
- Zeta: Contains ranged magic mobs with elemental immunity. This lane is most suitable for ranged physical attack classes.
- Eta: Contains melee physical mobs with physical immunity. This lane is suitable for magic attack classes. Alternatively, classes that use ranged physical and magic damage like clerics and archers are useful here since they can help kill Zeta mobs from range before running their lane.
- Theta: Contains stationary mobs that deal ranged physical damage. This lane is suitable for any class that can handle physical damage. Players can run through with the aid of the Holy Path Genie skill.
The 2 central gems should not be taken unless there are more than 8 players in the squad. They are the following:
- Eternity Gem
- Creation Gem
Players that choose these two gems are free to move throughout the dungeon and are referred to as lane assistants or escorts. Their job is to help the other players while they run through their lanes. A cleric is recommended for this task as they can heal, buff, purify, and revive players as they run through. Mystics are also ideal but will have to ensure players have the Resurrect buff on them. Another option is to choose a tank class for the role such as a barbarian, blademaster, seeker, or any class with decent defenses to help escort through. Alternatively, players may opt to have weaker squad members choose the central gem so that they do not have to deal with any mobs. These players would just stay at the entrance and wait for the rest of the squad to finish their part.
Beginning the Race[ | ]
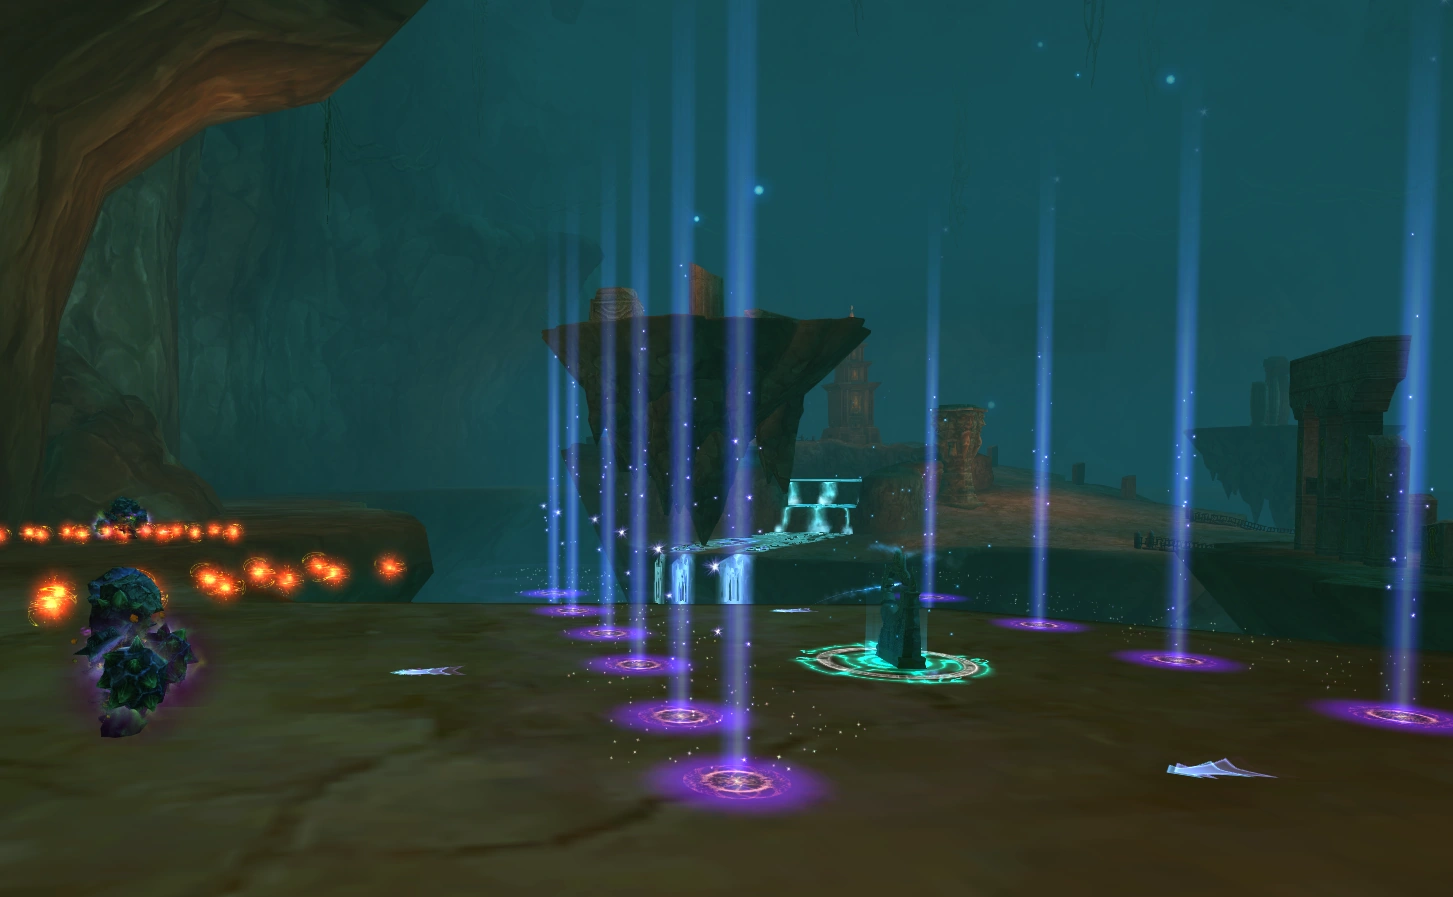
A lane in Endless Universe, showing the purple pillar boundary and red orbs.
Once all members have entered the dungeon and are ready to go, the squad leader should speak to Wade Slanh and choose the "Requirements (Leader)" quest and then the "New Trial (Leader)" quest afterwards. If for some reason they get a "Squad member not in range" message despite all players being inside, they can fix this by passing squad lead back and forth and trying again. All squad members should also check they don't have "New Trial (Members)" in their quest log and trash it if they do. Should the list of squad members change between "Requirements (Leader)" and "New Trial (Leader), the leader will need to re-take the "Requirements (Leader)" quest.
All players should get an Obsidian Pick. Wade Slanh will have quests for each gem which can be chosen by 1 player each. Members should check the quest list carefully to ensure they choose the right quest for the gem they've been assigned. The squad should establish who chooses which gem before beginning the dungeon; most players will do this by standing on their desired gem when entering the dungeon. Once a player has picked up the quest, they can go back and dig the gem based on the quest they chose. Upon digging the gem, the pillar will be teleported to an area with purple pillars of light, and arrows on the ground which show the direction for you to go.
Members may only move in their own area that is between their gem's Mirror of Eternity and the next Mirror of Eternity ahead (as indicated by the quest "Don't Leave: [Letter]". Do not move backwards outside of the purple area or jump off the edge or the relay race will fail and the squad will have to start over. If a member on a letter gem should die, they should not return to town; instead, they should wait until they can be resurrected or everyone finishes delivering their gems. If a player did not deliver their gem and cannot be resurrected, then the squad will have no choice but to start over. If the relay race does fail, everyone will need to return to the beginning of the dungeon by jumping off the edge (they will be teleported as they fall). The squad leader can then take the quest again at Wade Slanh and the squad will be able to start over.
Obtaining Divine Bless Buff[ | ]
When entering their area, members will receive an optional quest to kill mobs within your lane. Members kill enough of these you will receive the Divine Bless damage buff for the rest of the run, but it is not required. Mobs will have time to respawn a total of two times on an average relay. Players who choose the Eternity and Creation gems will be able to receive these buffs without needing to kill mobs. The requirements for each gem is as follows:
- Alpha: Kill 15 Alpha Gloomwing (9 exist per spawn)
- Beta: Kill 15 Beta Stoneguard (5 exist per spawn)
- Gamma: Kill 15 Gamma Flameguard (5 exist per spawn)
- Delta: Kill 35 Delta Seasprite (15 exist per spawn)
- Epsilon: Kill 8 Epsilon Soulreaper (7 exist per spawn)
- Zeta: Kill 15 Zeta Phantasm (5 exist per spawn)
- Eta: Kill 15 Eta Frostguard (5 exist per spawn)
- Theta: Kill 3 Theta Voidsphere (9 exist per spawn)
Creation and Eternity get credit by escorting players: they must be inside the active relay section at the time when they turn in their portion of the relay.
Running the Race[ | ]
Because this phase is like a relay race, it must be done in the order of the gems listed above: Alpha, Beta, Gamma, Delta, Epsilon, Zeta, Eta, and Theta. Once one player completes their lane, a message will appear in the chat box so members can more easily keep track of when it is their turn; at which point, a Mirror of Eternity will spawn with a quest available. Members should avoid standing too close to the mirror before they turn in, or else they may get stuck in the spawning mirror and potentially be unable to deliver their gem; they should take the quest from their Mirror of Eternity and run through their lane, following the arrows, and then hand in the quest to the Mirror of Eternity at the end of their lane. Make sure to not run further than the mirror at the end of the lane or the squad will fail the relay race.
2 Dark Envoys will spawn in each lane when that relay portion activates. Throughout each lane will also be rows of red orbs. Running through these orbs will have a random negative effect that will purge, drain mana, freeze, stun, slow, or reduce attack or channeling speed. They have a large range and will affect other players that are nearby. Players can avoid these orbs by using immunity skills or potentially with jumping skills (duskblades, blademasters, and assassins are particularly adept at this).
Once the final gem, Theta, has been delivered, the quest "Can't Leave" will complete, and a message will appear in the chat box telling players to return to the entrance. The squad can then safely jump off the edge to teleport to the entrance automatically.
Phase 2: Bosses[ | ]
To begin the second phase of Endless Universe, all members must gather at the beginning of the dungeon. Take this time to rebuff, as most players will have been purged from running through the red orbs earlier. First time players inside Endless Universe will also receive the quest "Essence Retrieval" to kill the 3 bosses in this phase so long as they have completed the small quest chain leading up to this dungeon.
The squad leader can talk to Zirihk Slanh and take the "Gem Delivery Success" quest to begin the second phase and spawn the bosses; taking the quests at Wade Slanh will do nothing. Once the squad leader has chosen the correct quest a message will appear in the chat box from Gorath, the first boss, indicating that the 2nd phase has been activated.
Note that players doing the Essence Retrieval, daily Activeness, or Bounty Hunter quests must be alive for their required boss kills to complete their quests. To get the final reward for the dungeon however, players do not need to be alive when the bosses die.
Gorath, the Worldrender[ | ]
Gorath is the first boss in Endless Universe. The squad can cross the bridge at the entrance to the first floating island to find him there. He will deal physical AoE damage and AoE knockback players, which can push them off the edge of the island sending them back to the beginning (this is an excellent opportunity for players to not get credit for the essence retrieval for Gorath). He will also interrupt Regeneration Aura (BB), so clerics are recommended to use Chromatic Healing Beam instead.
There are 2 large pillars near Gorath. Everyone can stand with their backs against the same pillar to avoid being pushed back. Melee characters should also face the same way with their backs to the same pillar so they will be only be pushed into the pillar instead of being pushed off the island.
Once Gorath is dead, the Mistress of Endless Night will spawn.
Mistress of Endless Night[ | ]
The Mistress of Endless Night is the second boss in Endless Universe. The squad can find her by crossing the bridge to the second island, turning right, and going along the bridge to the right. She is standing in the middle of a platform which players need to jump on to get to her. Be careful when doing this, as she can aggro nearby players. Players with lag may have trouble jumping onto this platform, while ranged classes do not need to do this.
This boss does deal AoE damage but will not interrupt Regeneration Aura (BB) so clerics can use this in the middle of the platform. When the boss's health is lowered enough, she will disappear and split herself into three. It is possible to kill her quickly enough before she splits by sparking and damaging as hard as possible, however she does become untargetable just before she splits. Auto attacks and constant AoEs will still land while she's untargetable.
When the Mistress of Endless Night splits into three, they will spawn around the same platform. One of them will have a defense buff on her; she is the real Mistress of Endless Night. The other two will not have buffs and are fakes. If there is a cleric using BB, aggro all three copies to keep them from attacking the cleric. Kill the two fake versions of the boss and the real one will lose her defense buff, allowing the squad to damage her properly. She will split again 2 more times and will die permanently after the 3rd time.
Ghost Wing[ | ]
Ghost Wing is the third and final boss of Endless Universe. To find him, go across the bridge you came from and move up towards the right. Ghost Wing has 2 phases.
Phase 1[ | ]
Ghost Wing will be flying throughout the air and will not attack players; he will continue to fly around the two large pillars to the right of the large floating island. Only players with ranged skills will be able to reach him, so make sure to have ranged players in squad. They can position themselves around the 2 pillars to reach him easily. The squad only needs to damage him to low health; do not kill him or no one will receive any rewards for the dungeon or any quests.
If Ghost Wing is not killed fast enough, he will spawn fire throughout the island along with some mobs that will attack players. The fire will deal constant damage to players which can be fatal. There is an area between the two pillars and a pool of water on the island which are both safe from the fire. The cleric can use Regeneration Aura (BB) between the two pillars to outheal the damage dealt by the fire if the squad cannot kill him fast enough.
Once Ghost Wing has been damaged enough, he will begin to fly away and you will see a message in your chat box. Everyone should stop attacking at this point.
Phase 2[ | ]
Ghost Wing will appear again with full health. This time when he is attacked, he will land and attack players; so melee characters can attack him. He deals AoE damage so it is recommended for clerics to use Regeneration Aura (BB) for this part of the boss.
If the boss is not killed quickly enough, a random squad member will be teleported off to a small floating island away from the squad. They can kill the mobs there to be returned back to the boss, or jump off to be teleported to the beginning and run back to the boss; it is generally easier to kill the mobs. Keep an eye on other squad members to make sure nobody is teleported away before the boss dies, as they will not get credit for any quests they have if they aren't nearby.
Once Ghost Wing is dead, players will receive the Master Plucker title if the dungeon was completed within 60 minutes.
Bonus Reward[ | ]
Once the squad has killed Ghost Wing, everyone should return to the entrance by jumping off the floating island. All squad members should gather at Zirihk Slanh at the entrance. Should any member of squad leave the dungeon, the rest of the squad will not be able to get rewards until they leave squad. The squad leader should take the "An Unexpected Gift" quest at Zirihk Slanh. All squad members will get this quest, and will receive an Order of Blades and a Reflective Shard as a reward.
The Order of Blades can be exchanged via quest at Zirihk Slanh for their choice of the following 2 rewards:
- Drunk Lotus Pill: Gives 400,000 experience and 150,000 spirit. Account stashable.
- Inconsistent Chest: Contains of the following items:
- Endless: Weapon Card (10%) - can be exchanged at Zirihk Slanh for a grade 13 Morai weapon of their choice.
- Endless: Armor Card (20%) - can be exchanged at Zirihk Slanh for a grade 13 Morai piece of armor of their choice.
- Mirage Celestone x20 (15%)
- Skypool Scriptures x8 (27.5%) - used to craft Quicksand Maze equipment
- Earthbless Tome x16 (27.5%) - used to craft Quicksand Maze equipment
Videos[ | ]
See Also[ | ]
| Dungeons | |
|---|---|
| The Midlands |
|
| Call to Duty | |
| Lothranis and Momaganon | |
| Morai |
|
| Primal World | |
| Celestial Vale | |
| The Western Steppes | |