
Flowsilver Palace is a dungeon inside Primal World and is the home to Tyrant Prince Mushi, where he plots the overtaking of the Primal World from Alexander, the Light Emperor, with the aid of his minions and his lover, the Mad Princess Belle Leun. Flowsilver Palace is available for players over level 100 who have reawakened twice, and have a Boundary level of Arcane Sky I. To enter Flowsilver Palace, players have to talk to Emerald Spellcaster at the Dragon Tower in Primal World.
Flowsilver Palace Judgment Mode is a required dungeon for Faction Goals for the Faction Base. Squads with 2 or more faction members can also earn Chivalry Points and Loyalty Funds through any mode, but will receive extra Loyalty Funds in Judgment Mode.
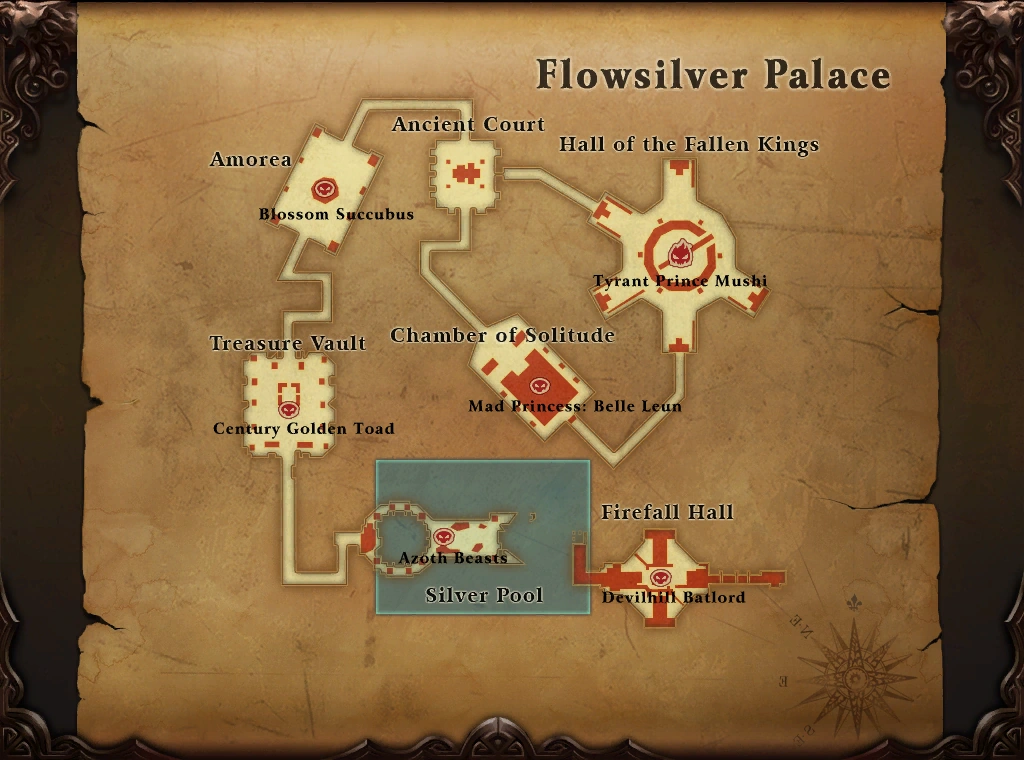
Map
Overview
Flowsilver Palace is a dungeon where players can get War Avatar Packs and Shiny Flowsilver Coins which they can afterwards exchange for rewards such as War Avatar Packs, items to gain Reputation, skill book pages and more. Previously if a player died in the dungeon they would be automatically teleported to the entrance, however as of the Wonderland expansion player death is treated normally; players have the option of respawning back at the entrance or being resurrected by a cleric. Players who die in Flowsilver Palace will not lose EXP. The NPC at the entrance of the dungeon will offer teleports to the Treasure Vault when unlocked and to the Chamber of Solitude in Judgment mode when unlocked. Mounts are allowed for quick travel in the Palace, as is embracing to gain chi.
Once inside, the leader will choose between either Deicide or Judgment mode. The latter gives more rewards than the former, but is also more challenging. Players can enter Flowsilver Palace as many times as they wish, but the daily quest can only be completed once per day.
Squad Structure
A good party to face either mode would consist of:
- A Barbarian: key character to keep the Golden Century Toad distracted, and also for the HP and strength buffs.
- Debuffers: Venomancer, Seeker, Blademaster, Stormbringer
- Damage Dealers: both physical and ranged.
- Healers: Cleric, Mystic
All the bosses in this instance have a buff that reduces the damage they get from physical attacks, thus rendering APS attacks less effective. These can be purged from all bosses, except the Golden Century Toad.
Entry
As of the Wildwalker Update, entry into Flowsilver Palace now requires a Relic of Wonder: Armor. One daily is obtainable from Emerald Spellcaster at Dragon Tower in Primal World (325, 529). Entry is done at Emerald Spellcaster, and consumes a Relic of Wonder: Armor.
Deicide Mode
In Deicide Mode, introduced with the New Horizons expansion, the players will face five bosses throughout the dungeon: Devilhill Batlord, Legendary Beast • Azoth Drake, Golden Century Toad, Blossom Succubus, and Tyrant Prince Mushi. This is the least rewarding mode of the two. Right after the entrance, you'll face a hall with 4-5 guillotines falling and raising at intervals. They do a lot of damage, so it's convenient to run past them when they're rising.
Devilhill Batlord
The floor is lava! Save for a few raised platforms, the room is flooded with lava: not in vain that it's called the Firefall Hall. At the very middle of the room, bridges will appear and disappear intermittently. At the very center, a flock of bats wait on you to step in to attack. Dispose of the bats, and then jump to the platforms at the right and left (North and South, on the map), killing the drakelings. After the leader starts the instance for those doing Judgement mode (or without any action from the leader for Deicide mode), dig the two pillars at the same time to raise the drawbridge and free the Batlord from his cage. He's pretty easy: he only stuns, puts a bleed DoT on whoever he's aggroed by, and not much more. A sin with Death Chain can link him, and then jump into the lava to die and hopefully bring him down in one shot with enough refined gear. The lava flood gate will retreat, and the squad will be ready to face...
Legendary Beast • Azoth Drake
Fill any missing slots in the squad at this time, because it's not too late for people to complete the boss kill quest yet. After going through a submarine hallway full of piranhas, you'll resurface among the Quicksilver Offspring of the dragon warding the silver pool. Destroy the eggs to wake up the dragon. The cleric can use Regeneration Aura up on top one of the arches, or get ready to run around. When facing Azoth Drake, he'll spawn a couple of things:
- Quicksilver Elites: These will freeze squad members. Combined with the next spawn, members might be in a tight spot.
- Blue circles of Death: These are like the orange circles at the dinosaur boss in Frostcovered City. After some time, he'll spawn three of these, which are timed, and explode dealing a good bit of damage. Hopefully the elites are dead by then, and you don't get frozen inside one while it explodes.
Upon the death of Drake, squad members may proceed through the hall to reach the next boss; however, a flaming boulder which will kill anyone it touches will go down the hall from the next boss's room to the entrance of the hallway.
Century Golden Toad
After avoiding the rolling stone, head out into the Treasury Vault. The stairs leading down to it have missing steps, and any members who fall in the gaps will die. After killing the guards in the Vault, golden toad statues will appear. If any female characters are in the squad, they have the option to kiss the toad (a quest will appear, spawning a kiss action symbol somewhere on their screen - they can click it outside of transformations like Violet or Ultraviolet to proceed). If not, smack them around until the big fat Toad appears. This boss has four special attacks:
- A massive frontal cone chop that does extremely high damage to everyone except Barbarians. This attack is why having a barbarian is almost a requirement for handling Toad. The tank must keep him facing away from the rest of the squad. Certain skills can allow you to avoid a 1-shot such as genie skill: Soul of Fire, Absolute Domain, Expel - Cleric skill; Pious Blessing - Stormbringer; Lunar Blessing- several invincibility potions such as Potent Invincibility Potion, Ironguard Powder, Sutra Power Orb, etc.. Also triple-sparking at the exact right time will avoid death.
- A periodic physical AOE stun.
- The boss will throw an axe at a player, stunning them and dealing minor damage, but they'll also get a sandstorm DoT that will kill them in 15 seconds if it's not purified or sparked away. This attack also triggers the spawn of a Shield-Destroyer Axe, a mob that has to be killed by a nearby DPS if the original target can't kill it to drop the item with which to attack Toad when he puts up his...
- Blue shield: this 30 second buff, shown like a blue shield in his buff/debuff bar, will not only make him invulnerable, but also make him recover HP while it's active. To get rid of it, right click on the axe if you have it in your inventory, or just click on the small window that will appear in the center of your screen when you have the toad targeted. Don't do it too soon, or too late, and don't pay attention to the message telling you to throw it, but at the buff bar. When you see the shield, fire at will!
Be aware that whoever is tanking must hold aggro and keep him facing away from the others, or else the squad could be wiped. The cleric will have to keep an eye out to purify squad members with the DoT.
When the Toad has been defeated, chests will appear around the room. These no longer drop any book pages, but they can also turn you into a frog, or turn into tentacle-filled chest monsters. Also, the NPC at the start of the instance will allow members to teleport to this area if they die further on in the instance.
Blossom Succubus
After killing the guards in the way, the squad will face the guardian of Amorea, a resentful lady with a bad temper. She is no more complicated than just a few quirks she has:
- Revenge: members have to spread out away from each other, or else she can squad wipe.
- Joy and Friendship: Group hug! If members don't all huddle up together, she can squad wipe.
- Self-healing: When it says that the Succubus is casting a healing spell (it's quite visible) a squad member must use cast-interrupting skills to keep her from regaining half of her health.
- Sleep a character at random.
- Reel everyone in, which does small damage.
Tyrant Prince Mushi
After going through the Ancient Court, the squad will reach the Hall of the Fallen Kings. The Five Kings of Perfect World, captured and possessed, will come from their thrones to try and keep you from harming their master, Mushi. Kill all the mobs in the room, including the Guard Captain, which will trigger the kings appearing and coming down to fight.
- Lenn Shin: physical immune, ranged.
- Bai Hau: powerful melee.
- Linn Shoyo: magical immunity.
- Linn Goyan.
- Yeh Kuhan.
If the squad fails to nuke these down one by one, they must do it as intended: by getting all 5 king's hp down to 60% to 50% before killing one entirely, as they will fully heal if any of the five has more than 60% HP at the point when the king in question drops below 40% HP.
Once the five kings are dead, Mushi is ready to come down from his throne and rain hell on your squad. He basically does three things:
- AOE knockback: this wouldn't be a big deal, if it weren't for the fires surrounding the room. Any member who gets pushed into the fire will die. It is advised that all players gather together between the stairs and the wall, so that when he knocks everyone back, they won't move.
- Free sparks: but there's a catch - any members who are at full chi prior to the throw will die.
- At 10% hp Mushi will be Empowered; a notification message will pop up and gives you 10 seconds to prepare for berserk damage - Barbarians can use Invoke the Spirit and Cornered Beast along with sparks to tank the damage, while DPS should either hold off a bit of use invincibility items/skills to survive unless he can be downed within 10 seconds. Once the empowerment is over he says in normal chat 'Uhm' - Whoever dies while empowered will heal up Mushi's HP by a certain amount.
Rewards
After defeating Tyrant Prince Mushi, players who have completed the Silvery Flow quest by defeating all bosses other than Devilhill Batlord will be rewarded with a 15 minute timed Flowsilver Prince Token. It can be exchanged at Resistance Force Vanguard Luvos in Mushi's lair via a quest for various rewards. If the player leaves the dungeon before taking and completing this quest or does not exchange the token within 15 minutes then it will disappear and the player will not be able to receive a reward for the day. Only one token can be awarded each day, regardless of which mode the player completes the dungeon in.
Once upon a time, players could receive various rewards from this token; however, those who have more than 200,000 Reputation no longer get this option. The reward for exchange is now:
- Songflow Ringstone x20
- Your choice of:
Those with less than 200,000 Reputation instead get:
- Shiny Flowsilver Coin x2
- Your choice of:
Flowsilver Prince Treasure
If the player has 5 Golden Splendors purchased from the Boutique, they can right-click on their Flowsilver Prince Token to combine it to make Flowsilver Prince Treasure. This item can be exchanged at Resistance Force Vanguard Luvos in Mushi's lair via quest for various rewards.
Players will receive 105 Shiny Flowsilver Coins, and will have the choice of the same rewards that the Flowsilver Prince Token offers. Players will also receive a Flowsilver Kill Order, which can be combined with 50 Golden Splendors to receive 1,000 Shiny Flowsilver Coins.
Judgment Mode
Judgment mode, or JFSP or FSJ, is the evolved version of the normal Flowsilver Palace, offering better rewards including more War Avatar Packs and Shiny Flowsilver Coins. In this mode, save for the Devilhill Batlord, the rest of the bosses have new challenges added to their tactics, as well as an additional boss after Tyrant Prince Mushi.
Legendary Beast • Azoth Drake
Besides his usual attacks, Drake will also spawn a whirlwind in the pool where he spawns. Surrounding it will be a few jellyfishes and mermaids, named like +1, +2, and x2. The trick to this is that, when the Drake calls for a certain math operation, kill the mobs in the right order. For example, "4+7" would be 11, so you'd have to do +2, +2 (4), +1 (5), x2 (10), +1, which gives 11. If the squad can't manage it within 30 seconds, the boss will heal completely. If the boss is pulled into the water, it will regenerate its HP.
Century Golden Toad
The added challenge to Toad will be the coins he'll spawn:
- The silver ones need to be killed, or they'll turn whoever they have aggro'd into a frog. If it's the tank becoming a frog, this will be a problem, since they'll be prevented from using their skills.
- The golden ones have a countdown from 3, and when they reach 0 they explode, dealing extremely high damage (most will be killed by this) to the players in the vicinity. Run away from them to avoid this.
Blossom Succubus
As well as the Revenge and Joy and Friendship moves, Succubus will also spawn some plants:
- The Envy Blossom (yellow plant) will have a countdown after Succubus calls for Revenge/J&F, and when it explodes it'll kill all the players nearby. It's advised that, if the players have to group up, they move away from it together.
- The Guardian Blossoms (blue plants) will cast an Invoke-type on the players that are right beside it, shielding them from the green blast that the Succubus will charge up and then fire. If you're not in the range of the buff, you'll most likely end up dead.
Tyrant Prince Mushi
In addition to everything which occurs in Deicide mode, Mushi will go berserk regularly, and to protect themselves, squad members have to create a dome of protection by attacking the chi crystals that will appear around the room. Always kill the crystals and shield yourself before sparking: members will have enough time even if he has done his free spark attack, but they won't survive his strike if they're not protected by the yellow dome, not even if they spark.
Mad Princess: Belle Leun
Mushi's lover, the Mad Princess is a boss introduced with the Riptide expansion. During the fight, she'll spawn mobs that either take more damage from physical attacks, or mobs that take more damage from magic attacks. Once she reaches approximately half HP, she will become immune to all damage. When this happens, one of the two bosses on the sides of the room will become active (either Mushi again, or Skyscreamer). In order to continue the fight, the squad must kill the miniboss that spawns. After that miniboss is dead, Belle Leun will become vulnerable again. She will occasionally spawn a ghost that will reel players in and explodes, dealing high damage (most will die from this). She won't move from her pedestal, which is very handy.
- As the fight starts, Belle Leun will spawn two different kinds of mobs: ones that take less damage from physical attacks, and others that take less damage from magic attacks. They deal quite a bit of damage, so they should be taken out before they can kill the squad.
- Eventually, and throughout the fight, a Ghost will appear. Be quick to look around, and put the pedestal between you and them, running behind it, to avoid getting reeled in and killed.
- At half HP, Belle will become invincible, and call forth either Mushi again, who will do his knockback and free spark, or Skyscreamer with an AoE stun. Defeating Skyscreamer means the squad has spent less than 15 minutes in the instance, and players will earn a title!
- After killing the minibosses, Belle will cast a Dark Curtain: when it's active, the next two skills cast will have a 180 second cooldown.
- She'll also cast a Life Reversion on a random player, which means that if they attack her, they'll heal her. Whoever is linked should step back and wait until the link is severed.
Rewards
After defeating Tyrant Prince Mushi, players that have completed the Silvery Flow quest by defeating all bosses besides Devilhill Batlord will receive a 15 minute timed Flowsilver Prince Token. Unlike Deicide mode, this token stays in the player's inventory until after Mad Princess: Belle Leun has been defeated. Once she has been defeated, the token will then convert into a 15 minute timed Flowsilver Princess Token. This token can be exchanged with Resistance Force Vanguard Luvos in Belle Leun's chamber via a quest for various rewards. If the player leaves the dungeon before taking and completing this quest, or either token expires then the token will disappear and the player will not be able to receive a reward for the day. Both the prince and princess tokens can only be obtained once a day regardless of which mode the player runs the dungeon in.
Players will receive 30 Songflow Ringtone along with their choice of the following rewards:
- Benevolence Seal x2
- Strongwind Badge x2
- Garan Stone x2
Flowsilver Princess Treasure
If the player has 5 Golden Splendors purchased from the Boutique, they can right-click on their Flowsilver Princess Token to combine it to make Flowsilver Princess Treasure. This item can be exchanged at Resistance Force Vanguard Luvos in Belle Leun's chamber via quest for various rewards.
Players will receive 108 Shiny Flowsilver Coins, and will have the choice of the same rewards that the Flowsilver Princess Token offers. Players will also receive a Flowsilver Kill Order, which can be combined with 50 Golden Splendors to receive 1,000 Shiny Flowsilver Coins.
Videos
| Dungeons | |
|---|---|
| The Midlands |
|
| Call to Duty | |
| Lothranis and Momaganon | |
| Morai | |
| Primal World |
|
| Celestial Vale | |
| The Western Steppes | |