
The Gauntlet of Nemesis is an event instance designed for Perfect World International's 9 year anniversary. It was originally designed as a 10 year anniversary event for the Chinese version of Perfect World, hence the ten year references made throughout the event. Although it was originally intended to be an anniversary event, it has occurred as a regular event as well. Previously the event rewarded Nemesis Jades, however this was changed in February 2018 to be Exquisite Jade Pads. These items can be exchanged for various rewards at Littlefoot in South-East Archosaur (596, 650). The Gauntlet of Nemesis cannot be started until the preceding quest line has been completed.
The Gauntlet of Nemesis can only be attempted by players who are level 90+ and have reached the Aware of Vacuity cultivation.
Quest Line
The quest line for the Gauntlet of Nemesis begins at General Summer in South-West Archosaur (521, 629). He will tell you that Littlefoot is visiting and he wants you to show her around Archosaur since he is busy with his duties.
- Talk to Littlefoot, located in South-East Archosaur near Mrs. Zoologist (596, 650). She will tell you she is meeting some friends in Archosaur and needs your help gathering them. You will receive multiple sub-quests at this point.
- Tiger Katsu: Talk to Tiger Katsu at the Northern Pass outside of City of the Lost (254, 687). He is unable to leave because he is taking extra guard shifts so he can afford to replace his old gear.
- Go to a Tailor inside City of the Lost and buy a Blessed Chain Hauberk for 420 Silver Coins.
- Go to a Blacksmith inside City of the Lost and buy Broad Bladed Hand Axes for 4080 Silver Coins.
- Return to Tiger Katsu. He will now be able to leave for Archosaur.
- Fox Shize: Talk to Fox Shize within City of the Lost (252, 635). She hasn't left yet because she wants an Oddfoot pet despite her sister insisting she can't have one.
- Go outside City of the Lost and kill Prickly Oddfoot Pups (264, 632) until you get a Knocked-out Prickly Oddfoot Pup. It is a 20% chance to obtain.
- Bring the Oddfoot Pup back to Fox Shize. She will attempt to tame it, fail, and decide to make her way over to Archosaur.
- Lee Shaja and Shil Saul: Talk to Lee Shaja in Battlemark Village (366, 459). She will reveal her brother has gone missing.
- Find Shil Saul in Forest of the Plume (363, 437). He will tell you that he wants to stop Lee Shaja's nightmares.
- Go to Priest Yuusa in City of the Plume (326,425) to get her advice to stop Lee Shaja's nightmares. You will get a charm.
- Return to Lee Shaja with the charm. Her and Shil Saul will now be able to make their way to Archosaur.
- Ouyan the Adventurer: Talk to Oyan the Adventurer at the Inn of the Eagle (422, 835). He will tell you he killed a great wolf but the people living in the area won't come outside.
- Find the "Wolf" near the Hunter Cabin and harvest it.
- Talk to Chang the Hunter at the Hunter Cabin (459, 838). You will learn here that Ouyan has actually killed Chang's hunting dog.
- Return to Ouyang the Adventurer at the Inn of the Eagle and tell him of his mistake, which you learn is not the first time it has happened. He will make his way over to Archosaur.
- Tiger Katsu: Talk to Tiger Katsu at the Northern Pass outside of City of the Lost (254, 687). He is unable to leave because he is taking extra guard shifts so he can afford to replace his old gear.
- Return to Littlefoot in South-East Archosaur near Mrs. Zoologist (596, 650). She will tell you to gather your friends and reveal to you the Gauntlet of Nemesis.
- Talk to her again to receive an Approval Letter. You can get one of these per day.
The Nemesis Stages
Previously the Gauntlet of Nemesis required a completion of multiple stages up until the Nemesis Chart of a particular stage to receive the reward of Nemesis Jades, however as of the Wonderland expansion this requirement was removed and Nemesis Charts are no longer offered to players. In addition, Nemesis stages are not completed in order and instead are given at random when a new instance has been opened, with the new requirement for rewards being completion of 2 Nemesis stages, regardless of which stages are completed.
In order to start a Nemesis stage, players must be in a squad of at least 2 people. They must also have an Approval Letter from Littlefoot which can be received once per day. The Approval Letter will be consumed once the required Nemesis stages have been completed, meaning players can only complete 2 Nemesis stages per day. However, if you already had an Approval Letter from the previous day, you will be able to receive another once you have used it up and be able to complete an additional 2 Nemesis stages.
To enter the Nemesis Gauntlet, players must talk to Star Reacher near Lunar Glade (459, 463 ↑57). You will need an Approval Letter to be able to enter. You can talk to Littlefoot in South-East Archosaur near Mrs. Zoologist to teleport there, or make your way over there yourself by going to Arrowhead Manor. You can talk to Apsaras at (426, 457) to be teleported up closer to the Lunar Glade.
Once inside, you will notice that the Gauntlet of Nemesis looks quite similar to the Lunar Glade, however the two instances are not the same. Additionally, players' stats will drop to a low amount which is determined by your class, regardless of gear. The Gauntlet of Nemesis will reduce your health, physical attack, magic attack, physical defense, and magic defenses which can make the instance quite a challenge. Guardian Scrolls do not work in the instance, meaning that players can lose EXP despite carrying them in their inventory.
Inside you will find Littlefoot and all of her friends, and the Old Swordsman. The Old Swordsman can either teleport you back to Archosaur, or into one of the Nemesis stages. There are a total of seven stages.
Note that you may leave and re-enter the Gauntlet of Nemesis as many times as you like, as failing the stage will simply return your Approval Letter, and therefore the quest can be activated again.
When you are teleported into the Nemesis stage of your choice, you will see Littlefoot standing alone near where you have been teleported. The squad leader must talk to Littlefoot to activate the stage, with the exception of Endless Impasse, the final stage.
Nemesis: Wraith Ceremony
Gaurnob Polearm in Wraithgate guards here and countless Swamp Wraiths are in it. You need to eliminate the wraiths before you can defeat Gaurnob Polearm.
The Wraith Ceremony was previously the first stage for the Gauntlet of Nemesis. You can teleport there by taking the Teleport: Wraith Ceremony quest from the Old Swordsman. Talk to Littlefoot in the Wraith Ceremony area to begin the Nemesis stage. The overall goal for this stage is to defeat Damned Gaurnob and Cenequus Polearm. There are two phases to this stage.
Phase One

Deadmarsh Kugulus
When the Nemesis stage is first started, 6 airships will spawn in front of Littlefoot. Each player should enter an airship by clicking on it, and then clicking the arrow on-screen prompt. You can move around in the airship and even float into the air with it the same way you would with flying.
You must kill the Deadmarsh Kugulus along the path which is easily done with the airships. To attack the Kugulus, hold down the right mouse button to aim your airship at them. When you have lined up your crosshair with the Kugulus, left-click while still holding down the right mouse button to fire. The shots act as AoEs, therefore it is recommended to aim for a larger cluster of Kugulus.
Once most of the Kugulus are dead, the remainder will disappear, your airship will disappear, Littlefoot and her friends will walk up towards the door blocking the way, and the second phase will be revealed.
Phase Two

Deadmarsh Generals and Deadmarsh Heathens
Ahead of the door that was previously in the way are several Deadmarsh Generals and Deadmarsh Heathens. Damned Gaurnob and Cenequus Polearm will be patrolling the area, however they are immune to damage. In order to damage them you will need Soultrap Charms and Soulrip Blades. These items drop from the Deadmarsh Generals and Deadmarsh Heathens. Soultrap Charms drop from Deadmarsh Generals and can be used to damage Damned Gaurnob, while the Soulrip Blades drop from Deadmarsh Heathens and can be used on Cenequus Polearm. These mobs will respawn after several minutes.
Note that since players' stats have significantly dropped in the Gauntlet of Nemesis, one must take care when killing both the mobs and the bosses, as they can do a large number of damage especially to those with lower defenses. It is not recommended to gather mobs and AoE them for this reason. It is also recommended to have a heavy armor based class to tank mobs and bosses, such as a blademaster, seeker, or barbarian. It is also recommended to have a healer that can also resurrect players, such as a cleric or a mystic.
Players should gather dozens of each item, 20 or more of each is a safe amount to gather. Once enough items have been gathered, one of the bosses should be pulled - luring with a pet or with the Zeal Genie skill Earthflame is safest. Healers should take extra care by using an immunity skill or apothecary item as they are almost guaranteed to get aggro at first because of their heals. To damage the boss players can either right-click the item in their inventory using the B key or click the on-screen prompt. Players may also want to use immunity skills or apothecary items while killing each boss, or alternatively run around with them while using their items. This should be repeated until the boss is dead.
Once both bosses are dead, all of the monsters will disappear, and Littlefoot and her friends will walk along to the end of the valley, where the Star Reacher will spawn. Players can hand in their quest at Star Reacher if they have completed 2 Nemesis stages. They will also be teleported to South-West Archosaur near Littlefoot where they can exchange their jades for prizes. Players who have not completed 2 Nemesis stages can talk to the Old Swordsman in the same area to teleport to the next stage.
Nemesis: Twilight Grudge
Illusion Lord Armageddon guards here. This place is full of traps. You need to remove the traps before you can complete this challenge.
Twilight Grudge was previously the second stage for the Gauntlet of Nemesis. You can teleport there by taking the Teleport: Twilight Grudge quest from the Old Swordsman. Talk to Littlefoot in the Twilight Vengeance area to begin the Nemesis stage. The overall goal for this stage is to kill the Twilight Minister, Twilight Emperor, and Illusion Lord Armageddon.
Twilight Minister

Twilight Minister
When the Nemesis stage begins, the Twilight Minister will spawn in the next room ahead. It functions rather similarly to its Twilight Temple counterpart. When the boss is attacked, it will stay in place and not move regardless of how far players stand back. Hands will spawn on the ground, with a green barrier around them indicating their range. When they explode, they will do a small amount of damage. Archers can avoid this and any other attacks by using Galvanic Aura and then Barrage of Arrows out of range of the hands. The boss will also sleep players at random intervals and damage them with an earth damage-over-time (DoT) skill. Melee or close-ranged players should take care while fighting this boss as it will deal damage to anyone who is close.
Once the boss has died, it will drop several Old Heaven's Tear materials, and Twilight Wraith Fighters will spawn ahead. These Twilight Wraith Fighters have an unusually high aggro range, being able to detect players from across the other side of the room potentially. For this reason, players should take care not to move through the Twilight Vengeance area too quickly to avoid attracting all of the fighters. Use crowd controlling skills such as stunning, freezing, and slowing skills to keep the mobs at bay. There will be two split paths ahead and Twilight Wraith Fighters will not only be on both of these paths but they will approach you from both sides, so it does not matter which path you take. Eventually when the paths meet up again you will see the Twilight Emperor.
Twilight Emperor
The Twilight Emperor is similar to its Twilight Temple counterpart. It will occasionally silence, freeze and reduce channelling speed, stun players, debuff with a wood damage-over-time (DoT) skill, use an Occult Ice skill on a single player, deal AoE damage, and more. The Occult Ice skill will place a water DoT on a player and stun them in a purple bubble. The boss will also buff itself with increased attack speed occasionally. It is recommended to attack the boss from maximum range, just like the Twilight Minister, as the boss does not move from its place. It will also deal more damage to players that are close in range.
Once the boss has died, it will drop several Old Heaven's Tear materials, and hands, flames, and towers will spawn on the left path behind where the Twilight Emperor once stood. Unlike the hands at the beginning of the stage, these ones can kill players if they are in their green barrier. Flames will appear on the sides of the path and will kill players if they touch them. There are several Dark Glass Towers along the path. Each one will do AoE damage while also reducing players water defense, and respawn quickly once they are killed. Players should kill towers that are ahead of them while moving along the path quickly when it is safe to do so. At the next room will be Illusion Lord Armageddon, the final boss of the stage.
Illusion Lord Armageddon


The stone hands and Dark Glass Towers, just before Illusion Lord Armageddon
Just like the two prior bosses, Illusion Lord Armageddon is similar to its Twilight Temple counterpart and will also not move from its spot. It, like the other bosses, also can deal damage more to players that are close-range, so it's recommended to tank it from afar. The boss will occasionally debuff certain players with curse, meaning they will take more damage. Usually this is followed by a second attack which can be deadly, so the debuff should be purified as soon as possible. It will also occasionally buff itself with increased physical defense, magic defense, physical attack, and magic attack for a short time. Towards the end of the fight Illusion Lord Armageddon may also debuff players with a mana drain and reduced accuracy. Overall this boss is the most likely to kill players in the stage and proves to be a rather difficult boss.
Once Illusion Lord Armageddon has died, it will drop several Old Heaven's Tear materials, and the hands and flames in the hall before will disappear. Players can backtrack through this hall and then take the right hall behind where Twilight Emperor stood before, with the purple glowing pavilion at the end. Players can hand in their quest at Star Reacher there if they have completed 2 Nemesis stages. They will also be teleported to South-West Archosaur near Littlefoot where they can exchange their jades for prizes. Players who have not completed 2 Nemesis stages can talk to the Old Swordsman in the same area to teleport to the next stage.
Nemesis: Warsong Mayhem
The Incacerate, the absolute domination of Warsong City, will appear in this stage. One who has the power to defeat the Vengeful Troop with the cannon will face him at last.
Warsong Mayhem was previously the third stage for the Gauntlet of Nemesis. You can teleport there by taking the Teleport: Warsong Mayhem quest from the Old Swordsman. Talk to Littlefoot in the Warsong Mayhem area to begin the Nemesis stage. The overall goal for this stage is to kill Pestilent Destroyer, Shadowskull Lich, and The Incacerate.
Pestilent Destroyer

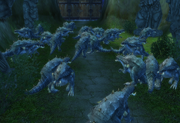
Dino Soulreapers
When the stage begins, Dino Soulreapers will spawn all the way along the hall. These must be killed in order for the Pestilent Destroyer to spawn. The Dino Soulreapers are not like their Warsong City counterparts and will only attack players with melee physical damage, so players can gather small groups and use crowd controlling skills such as stuns, freezes, and silences to deal with them. Once they are all dead, the Pestilent Destroyer will spawn shortly after. It will not aggro players automatically.
The Pestilent Destroyer is similar to its Warsong City counterpart, widely known as the boss of the wood pavilion. This boss is the deadliest of the three bosses in this stage. It will mostly attack with a physical melee attack, but can also debuff players with an earth damage-over-time (DoT) skill. This DoT skill cannot be purified and can stack, making it easy for players to die. It will also use an AoE that can interrupt players. Clerics can use Regeneration Aura (Blue Bubble or BB) to soften the blow, though it can be interrupted every so often. The boss will also spawn lots of Dino Soulreapers around where he spawns, so it is highly recommended to lure him away from his spawn point; near where the NPCs are standing is far enough to not risk attracting the dinos. If the squad wipes and the boss resets, these dinos will not disappear so players may have to lure the boss with a pet or the Zeal Genie skill Earthflame.
Once the boss has died, it will drop Warsong Emblems, Warsong Essence Lv9s, and Mirage Celestones. All of the dinos that have spawned as a result of the boss will immediately die. Littlefoot and her friends will walk along the hall, and the door will open once they reach the end of the hall. They will walk into the next room and stop there as the next phase has to be started by the squad leader.
Shadowskull Lich


One of the machines in the second phase
This phase of the stage is not deadly like the first phase, however is more a challenge of killing quickly. Once the squad leader takes the quest from Littlefoot, Inferno Skulllords will fill the room, and two machines will spawn. Players can enter the machines by clicking on them and then clicking the arrow on-screen. They will not be able to move the machine but will have access to two skills:
- Drill: This skill is mainly used for Inferno Skulllords. It will do AoE damage to them. It is ineffective against Shadowskull Lich.
- Cut: This skill is mainly used for Shadowskull Lich. It will damage it and slow it down. It is ineffective against Inferno Skulllords.
The remaining players not in machines must pull the Inferno Skulllords over to the players using the machines. Thankfully the Skulllords do not deal much damage so it is very easily possible to pull every single one of them safely. The players in the machines should use the Drill skill with the 1 key to kill the Skulllords.
Once enough Skulllords have been killed, two Shadowskull Liches will spawn on both sides of the room, ahead of the machines. They will slowly move towards the machines but will not attack players. Players must kill both Shadowskull Liches before they reach the machines or the phase will fail and players will have to attempt it again. The Inferno Skulllords should be completely ignored at this point as they do not deal much damage and focus should solely be on the two bosses. Players can choose to use the machines and use the Cut skill with the 2 key to damage and slow the Shadowskull Liches, while the rest attack the Shadowskull Liches, though the machines do not have to be used. Players that are not in the machines should make sure to debuff the bosses for extra damage and use any slowing skills as these will help delay the bosses from reaching the machines.
Once the bosses have both died, Littlefoot and her friends will walk ahead through the split paths, and the doors will be opened. Go through to the final room and The Incacerate will spawn there.
The Incacerate
This final phase of the stage is easier than the other two stages, as The Incacerate does not do much during the entire duration of the fight. It will also not move from its spot so it can be attacked from range. Players that are close range may be attacked with a melee physical skill from the boss if they have aggro. During the fight, copies of Littlefoot's friends will slowly walk up and join the original groups of NPCs; this is a bug and they will disappear when The Incacerate dies.
Once The Incacerate has died, it will drop Warsong Emblems, Warsong Essence Lv9s, and Mirage Celestones. Star Reacher and the Old Swordsman will spawn at the end of the room on the pavilion. Players can hand in their quest at Star Reacher if they have completed 2 Nemesis stages. They will also be teleported to South-West Archosaur near Littlefoot where they can exchange their jades for prizes. Players who have not completed 2 Nemesis stages can talk to the Old Swordsman in the same area to teleport to the next stage.
Nemesis: Legion Onslaught
Legion Marshal guards here. He is a master of deploying soldiers in the battlefield. Pay attention to the movement of whole legion and eliminate the legion soldiers.
Legion Onslaught was previously the fourth stage for the Gauntlet of Nemesis. You can teleport there by taking the Teleport: Legion Onslaught quest from the Old Swordsman. Talk to Littlefoot in the Legion Onslaught area to begin the Nemesis stage. The overall goal for this stage is to kill the Zombie Legion Marshal, the Dark Legion Marshal, and the Legion Marshal.
Ahead of Littlefoot will spawn a Legion Supervisor. This supervisor will attack players with an earth damage-over-time (DoT) skill and slowly walk towards players. Once it has died, the door behind it will open, and Littlefoot and her friends will walk through to the middle of the next room. The next step can be started by any player by talking to Littlefoot. This stage operates similarly to Delta.
Zombie Legion Marshal

Zombie Legion Marshal
After a player has taken the quest from Littlefoot, an aura will spawn around her and her friends, and the first wave of the Zombie Legion will appear in front of players. There are a total of five waves, and each wave must be killed in time or this part of the stage will fail and have to be attempted again by talking to Littlefoot.
Each wave of the Zombie Legion consists of a Legion Supervisor and Zombie Legion Soldiers, and they will all spawn in the same area. Unlike the Legion Supervisor at the beginning of the stage, this supervisor will only attack players at melee range and will not do any DoT damage. Players can set up AoEs either around Littlefoot or closer to where the waves will spawn to easily catch and kill the Wraiths, as they walk rather slowly.
Once all five waves have been killed, the Zombie Legion Marshal will spawn. The boss itself is very similar to its Delta counterpart. It can debuff players with two different earth DoT skills; one can be purified, one can not be. It can also stun and debuff players with a health reduction debuff however does not actually work. On occasion it can also stun the tank and debuff them with a curse debuff.
Once the Zombie Legion Marshal has died, it will drop several items including Old Heaven's Tear materials and Old Book Pages. The door ahead will open and Littlefoot and her friends will make their way through until the middle of the next room.
Dark Legion Marshal


A Dark Legion wave
Just like the previous part, any player can take the quest at Littlefoot to begin this part of the stage. Another aura will spawn around her and her friends, and the first wave of the Dark Legion will appear in front of players. There are a total of five waves, and each wave must be killed in time or this part of the stage will fail and have to be attempted again by talking to Littlefoot.
Each wave of the Dark Legion consists of a Legion Supervisor and Dark Legion Soldiers. The first and third waves will spawn in front of players, while the second and fourth waves will spawn from behind. The fifth wave will spawn both in front of and behind players, with the Legion Supervisor at the front. The Legion Supervisor will again only attack players at range and will not do any DoT damage. Players can set up AoEs either around Littlefoot or closer to where the waves will spawn to easily catch and kill the Wraiths, as they walk slowly, however they can spawn from two different places this time.
Once all five waves have been killed, the Dark Legion Marshal will spawn. Again, this boss is very similar to its Delta counterpart. It can debuff players with an earth DoT which cannot be purified, or a wood DoT which can be purified. The boss can also sleep players on occasion. Like the Zombie Legion Marshal, the boss can also stun the tank and debuff them with a curse debuff.
Once the Dark Legion Marshal has died, it will drop several items including Old Heaven's Tear materials and Old Book Pages. The door ahead will open and Littlefoot and her friends will make their way through to the final room where the final boss will be. There are no more phases with waves beyond this point.
Legion Marshal
In the final room will stand the Legion Marshal. He will generally do the same skills that his Delta counterpart does. It will not attack players with a DoT skill, however it can attack with a weak AoE that slows players, or an AoE that does a higher amount of damage. The boss also debuffs physical defense, however the debuff is ineffective in the Gauntlet of Nemesis. It can purge the squad, however this does not happen often.
Once the Legion Marshal has died, it will drop several items including Old Heaven's Tear materials and Old Book Pages. Star Reacher and the Old Swordsman will spawn at the end of the elevated land in the same room. Players can hand in their quest at Star Reacher if they have completed 2 Nemesis stages. They will also be teleported to South-West Archosaur near Littlefoot where they can exchange their jades for prizes. Players who have not completed 2 Nemesis stages can talk to the Old Swordsman in the same area to teleport to the next stage.
Nemesis: Nirvana Mound
The Wraith archmage Vanished Ancestor will be in this stage, protected by Arbiter of Flame and Goldwing Phoenix. Kill the latter first and meet Vanished Ancestor at last. Remember that the time interval between killing Arbiter of Flame and killing Goldwing Phoenix must be less than 10s, otherwise Vanished Ancestor would revive them.
Nirvana Mound was previously the fifth stage for the Gauntlet of Nemesis. You can teleport there by taking the Teleport: Nirvana Mound quest from the Old Swordsman. Talk to Littlefoot in the Nirvana's Rebirth area to begin the Nemesis stage. The overall goal for this stage is to kill the Spirit Fox, Arbiter of Flame, Goldwing Phoenix, and the Vanished Ancestor.
Spirit Fox


Darkwing Corpses
Once the stage has begun, two groups of Wraiths will spawn at the end of each bridge. On the left side will be Darkwing Corpses, and on the right side will be Infernal Gargoyles. In order for the Spirit Fox to spawn, 50 of each must be killed. The mobs do not aggro players by default and respawn quickly when they are killed. If the squad has a seeker and a cleric then it is possible for the seeker to set up a Yataghan Vortex while the cleric sets up a Regeneration Aura (Blue Bubble or BB) to easily kill the groups. Setting up AoEs with other classes can become overwhelming quite quickly, therefore it may be easier for the squad to pull smaller groups or kill the Wraiths individually.
Once 50 Darkwing Corpses and 50 Infernal Gargoyles are killed, the Spirit Fox will spawn. It can spawn on either the left path or the right path, slightly ahead of the group of Wraiths that were once there. The boss will not actually attack players unless they are close enough to it, so it is possible to kill it safely from range.
Once the Spirit Fox has died, the Arbiter of Flame and Goldwing Phoenix will spawn.
Arbiter of Flame and Goldwing Phoenix
The Arbiter of Flame will spawn on the right path, while the Goldwing Phoenix will spawn on the left path. Both of these bosses need to die within 10 seconds of each other in order to spawn the Vanished Ancestor. If players fail to do this then the bosses will simply spawn again.
The Goldwing Phoenix is similar to its Nirvana counterpart, where it will spawn as a tiny bird that is level 100, and then transform into a larger one that is level 150 once its health drops far enough. Note that the larger version of the Goldwing Phoenix needs to die with the Arbiter of Flame. Like the Spirit Fox, it will not attack players if attacked from a far enough range. Upon getting closer to the boss it will attack whoever has aggro with a ranged attack and can also disable players with an Ice Prison effect and debuff players' physical and fire defense, however the debuffs are ineffective due to the nature of the Gauntlet of Nemesis.
The Arbiter of Flame, like the previous bosses in this stage, will not do anything if attacked from a far enough range. Upon getting closer to the boss it will attack whoever has aggro with a ranged attack and can also attack with a fire DoT skill, however does not do much else.
Once the Arbiter of Flame and Goldwing Phoenix have died within 10 seconds of each other, dozens of Shadowmetal Ghouls will spawn and immediately rush to attack players. The Vanished Ancestor will also spawn however the Shadowmetal Ghouls must be killed first. Similar to the Twilight Grudge stage, these Wraiths can be aggroed from a far distance and must be killed by using AoE skills. They may have to also be kited by running and attacking with ranged skills as well. When they are all dead, only the Vanished Ancestor will remain.
Vanished Ancestor


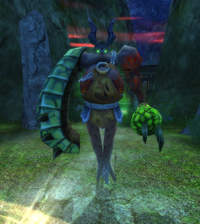
The Vanished Ancestor
The Vanished Ancestor will stand by his lonesome in front of Littlefoot and her friends. He works similarly to his Nirvana counterpart. Every so often he will spawn an elemental Wraith, however no elemental chests will spawn, meaning that it cannot be sealed as per usual and will inevitably explode after 30 seconds which can kill everybody in the squad. Therefore, when the boss spawns the elemental Wraith, players should attempt to use immune skills or apothecary items around 27 seconds after it spawns to avoid the lethal explosion.
Other than spawning the elemental Wraith, the Vanished Ancestor will also attack the tanker from range with one weaker attack and one stronger attack. He will generally not move from his place. Every so often however the boss will also silence the squad and will move during that time.
Once the Vanished Ancestor has died, he will drop Uncanny Crystals and Rapture Crystals. Star Reacher and the Old Swordsman will spawn at the end of the room behind where the Vanished Ancestor previously stood. Players can hand in their quest at Star Reacher if they have completed 2 Nemesis stages. They will also be teleported to South-West Archosaur near Littlefoot where they can exchange their jades for prizes. Players who have not completed 2 Nemesis stages can talk to the Old Swordsman in the same area to teleport to the next stage.
Nemesis: Harpy Maze
Harpy Wraith, Buddha's Servant and Primal Fear guard this stage. To challenge them, the traps in the stage should be closed. The core of the traps is on the gravestones.
The Harpy Maze was previously the sixth stage for the Gauntlet of Nemesis. You can teleport there by taking the Teleport: Harpy Maze quest from the Old Swordsman. Talk to Littlefoot in the Harpy Maze area to begin the Nemesis stage. The overall goal for this stage is to kill Harpy Wraith, Buddha's Servant, and Primal Fear.
Harpy Wraith


Harpy Wraith
Once the stage has been activated, Harpy Wraith will spawn in the next room surrounded by lava, save for an opening at the beginning and the end of the room. The flames and lava will kill players that walk over it. When Harpy Wraith is attacked however, these openings will be covered with lava so players should stand close to the boss for the beginning of the fight.
During the battle, Harpy Wraith will spawn her lightning aura, or blue circles on the ground in certain patterns that will change during the battle. Standing in these circles will deal magic damage to players who stand in them, however several will spawn at a time which means the damage can stack. Harpy Wraith in general will attack the tank with a ranged attack and occasionally will also reel them in towards her in an attempt to kill them with the lightning aura. The boss will also AoE the squad and debuff them with a slow and water defense debuff however due to the nature of the Gauntlet of Nemesis the water defense debuff is ineffective.
Once Harpy Wraith has been killed, the lava and lightning aura will disappear and the door will open, allowing players to make their way to the next room and the next boss, Buddha's Servant.
Buddha's Servant
Just like the previous boss, Buddha's Servant's room will be surrounded by lava, save for an opening at the beginning and the end of the room which will be covered with lava once the boss has been attacked. Large flaming rocks will also spawn from behind the boss and slowly make their way across the room before exploding. Players should steer clear of these flaming rocks as they will kill anyone who stands in their way. The boss itself does not do much other than attack the tanker with a ranged attack and debuff the squad with a water defense debuff, however it is ineffective.
Once Buddha's Servant has been killed, the lava will disappear and the door will open, allowing players to make their way through to the next part of the stage.
Primal Fear
Around the corner will be a room full of lava and moving bubbles. The moving bubbles will kill anyone who walks over them. Players can attempt to navigate through this deadly path, or simply use an immunity skill or apothecary item and run through without being killed. The room beyond this path contains many eggs. Players must dig eggs in order to find and kill 10 Primal Fear Pups. There is a chance of an egg containing a Primal Fear Pup, and a chance of them containing several (and sometimes an unnaturally large amount) Primal Fear Guardians which must be killed. Because of the risk of the Primal Fear Guardians possibly becoming overwhelming players should avoid digging several eggs at once, however it is possible to set up AoEs along with a cleric's Regeneration Aura (Blue Bubble or BB).
Once 10 Primal Fear Pups have been killed, the eggs will disappear and Primal Fear itself will spawn. It can be killed from range safely without being damaged, and will only attack players if they get close enough to it. It will buff itself with increased attack speed and physical attack and can also purge players.
Once Primal Fear has died, the stage will be completed. Star Reacher and the Old Swordsman will spawn at the end of the room behind where Primal Fear previously stood. Players can hand in their quest at Star Reacher if they have completed 2 Nemesis stages. They will also be teleported to South-West Archosaur near Littlefoot where they can exchange their jades for prizes. Players who have not completed 2 Nemesis stages can talk to the Old Swordsman in the same area to teleport to the next stage.
Nemesis: Endless Impasse


Three of the essences that need to be destroyed
Here gather 8 ferocious and bloodthirsty bosses: Krimson Beyond, Empyrean Slither, Dismal Shade, Kimsa the Claw King, Watchman Chin, Fengsha, Blizzard King and Skyscreamer. Every boss has its own essence. Find it to start the challenge!
Endless Impasse was previously the seventh and final stage for the Gauntlet of Nemesis. You can teleport there by taking the Teleport: Endless Impasse quest from the Old Swordsman. The overall goal for this stage is to kill all 8 of the following bosses: Eyes of the Krimson Beyond, Empyrian Slither, Dismal Shade, Kimsa the Claw King, Watchman Chin, Fengsha, The Blizzard King, and Skyscreamer.
Once players enter the Final Stand area, they will notice Littlefoot and her friends, who have suddenly changed to appear quite powerful. The area is surrounded by water, with a door behind where they stand. Do not begin the stage yet, as the bosses will immediately spawn and attack players where they stand. The bosses themselves have a long aggro range and can attack from afar without moving, which can prove deadly to most. The stage can be started by any player, so one player should stay behind at Littlefoot while the rest of the squad stands at the doors, ready to run through them when the stage begins. The player that starts the quest can either be a heavy armor class or be prepared to use an immunity skill or apothecary item to escape the bosses. When everybody is ready, start the stage by talking to Littlefoot and then run through the doors through to the valley covered in mist. There, everybody will be safe from the bosses.
The bosses themselves are invulnerable, and only become vulnerable once their essences are found and destroyed. All 8 essences can be found in the valley where the players have run to. Going around the valley are 8 flames which can kill players if they stand on them, however on occasion they will transform into the essence of one of the 8 bosses. Attacking an essence will destroy it. This should be repeated until all 8 have been destroyed or there are no flames left in the valley.


Dismal Shade, Watchman Chin, The Blizzard King, and Skyscreamer
Once all of the essences are destroyed, it is time to kill the bosses. Note that the closest two bosses, Empyrian Slither and especially Eyes of the Krimson Beyond, will be targeting a player and will be ready to attack that player once they are in range. It is recommended to start with Eyes of the Krimson Beyond first as it is closest, and then Empyrian Slither so that if players die it is easier for them to return to the area. Before getting in range of the bosses, check which squad member the boss is targeting. It is almost certain they will attack that player once they get in range, so if they are an arcane armor class or a cleric then they should stay back until another player gets aggro. There are two methods squads can use to kill the bosses:
- Kill them normally. While not the safest option, it is quicker. Have a tanky class such as a heavy armor class rush up to the boss and attack it to generate aggro. Other players can join in once it is safe to do so.
- Kill them from the water. This is the safer option. Because the bosses are on land, they will only attack players for half damage in the water, however this also applies when players attack the bosses. It also requires players to almost exclusively use ranged attacks.
Every boss functions the same way. They will attack a player from range with a physical attack, and on occasion cast a weaker AoE skill that will hit all players. The attacks themselves can be a very long range, and because they are physical are deadly to arcane armor classes.
Once all 8 bosses are dead, the stage will be completed. Star Reacher and the Old Swordsman will spawn on the opposite side of the ring of Littlefoot and her friends. Players can hand in their quest at Star Reacher if they have completed 2 Nemesis stages. They will also be teleported to South-West Archosaur near Littlefoot where they can exchange their jades for prizes. Players who have not completed 2 Nemesis stages can talk to the Old Swordsman in the same area to teleport to the next stage.
Rewards
The reward for completing 2 Nemesis stages per day is 12 Exquisite Jade Pads. These can be exchanged with Littlefoot in South-East Archosaur near Mrs. Zoologist (596, 650).
Previously the rewards for completing Nemesis stages were Nemesis Jades, however these were changed with the Wonderland expansion, and can no longer be exchanged for prizes. Most exchange rates for the rewards are the same as previously, however the title Perfect Nemesis is no longer obtainable. Instead the title has been replaced with a 30-day timed title named Days of Friendship. The Ginger Tiger and Giant Ginger Tiger pets are also no longer obtainable.
| Item | Quantity | Exquisite Jade Pads Required |
|---|---|---|
| 1 | 300 | |
| 1 | 4 | |
| 1 | 8 | |
| 1 | 16 | |
| 1 | 32 | |
| 1 | 1 | |
| 20 | 1 | |
| 10 | 1 | |
| 1 | 10 | |
| 1 | 36 | |
| 1 | 400 | |
| 1 | 120 | |
| 1 | 3 | |
| 1 | 3 |