
The Undercurrent Hall is an instanced dungeon inside Primal World which is available for players over level 100 that have reawakened once and have a Boundary level of Arcane Sky I. To enter Undercurrent Hall, players have to talk to Light Emperor Alexander at Kirin Town in Primal World.
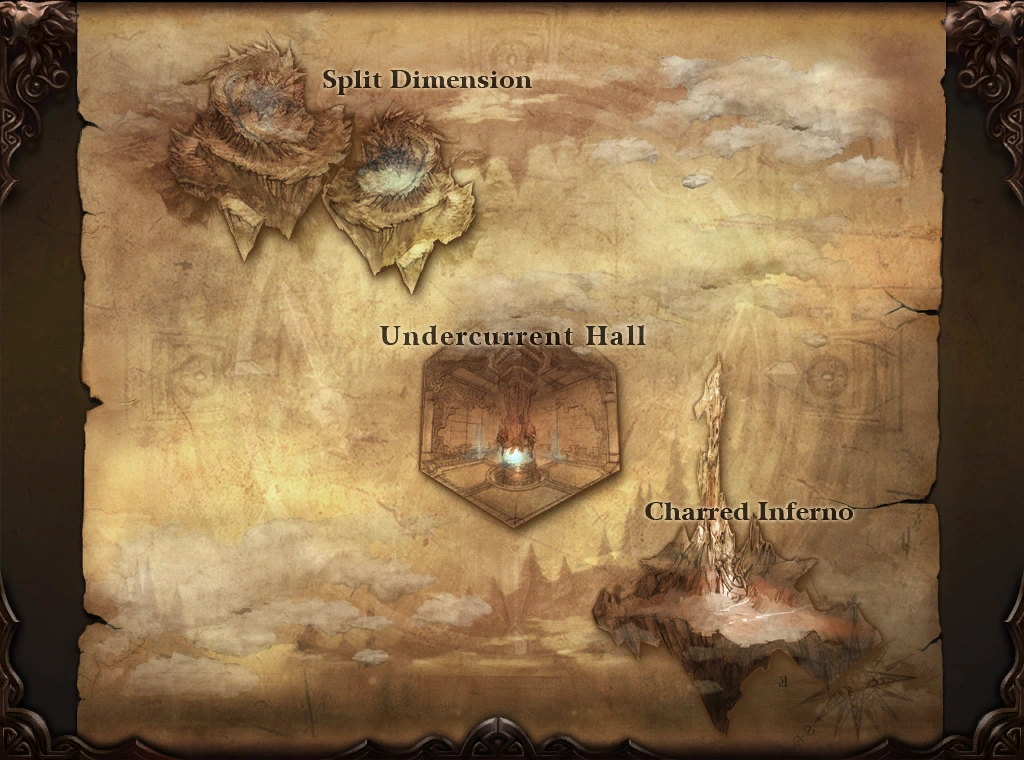
Map
Unlike most maps, Undercurrent Hall's map does not accurately show where the players are located but instead is more of a diagram of the 3 areas in the dungeon.
Rewards
Upon entry to Undercurrent Hall, players automatically receive the daily quest for Activeness Points. This requires killing Inferno Lord Phyrex, and either of the two dragon bosses. Rewards are as follows:
- Underworld Glowstone x5
- War Avatar Pack C x16
- Undercurrent Coin x2
- Starglade Chest
- Astrobana Pearl Lv1 x2
- Astrospira Pearl Lv1 x2
- Nebula Dust Orb x2
Entry and Initiation
To gain access to Undercurrent Hall, players will need to obtain a Relic of Wonder: Artifact. One daily is obtainable from Light Emperor Alexander in Kirin Town in Primal World. Entry is done at Light Emperor Alexander, and consumes a Relic of Wonder: Artifact.
To initiate the instance, speak to Undercurrent Guardian and select "Fighting Wind and Fire"
Fire Path
Upon instance activation, arrows will appear along the ground leading to an orange portal; follow them into the portal to enter Fire.
First Phase: Poking the Fire
Inferno Lord Phyrex is way up in the sky in the center of all this lava. Fortunately, players can fly in this instance, and as such, should fly up and kill the mobs circling around him in order to remove his protections, and then kill him.
Second Phase: Fighting Fire with Water
Once Inferno Lord Phyrex is dead, monsters will spawn in the air and start dropping meteorites to kill wizard NPCs, which must be protected; there are two ways to do this: either the monsters can be eliminated, or players can also hit the Orbs of Water that spawns close to each NPC. Hitting the orb when a meteorite is close to the ground will make it dissipate and the NPC will take no damage. If the squad fails this stage, it will automaticall restart.
Third Phase: Burning through Resistance
Once the NPCs have been saved, monsters will appear on the other side. The squad must not let the monsters pass. After four waves of beetles (which can be dispatched), Phyrex will emerge from hiding.
Inferno Lord Phyrex
After all stages of the Fire path have been completed, the real Inferno Lord Phyrex will spawn. One player should attack the boss while four other players jump on the altar lights on the right (once Phyrex is activated, no player will be able to fly until after he's dead). Activating the right altar will cause Inferno Lord Phyrex to receive a debuff that allows the squad to deal more damage. The left altar can be activated in a similar manner to receive a squad attack boost.
The boss sometimes buffs himself so it's recommended to have someone with purging abilities in squad, such as a Venomancer. The boss will also freeze selective members and unleash a strong five-pronged laser attack that will kill anyone standing in its light.
Wind Path

Floating rings in the Wind Path.
Upon Phyrex's death, players can go back to where they entered fire to be teleported back to the main hall, where new arrows lead to a blue portal; go through this portal to reach the Split Dimension, the Wind path. Once teleported, players will need to fly as soon as possible so as to assist with the first phases.
Phase 1a: Wind Spells
Phase 1 of the Wind path is divided into two parts, which are recommended to be done simultaneously; for the first part, the squad is recommended to assign one or two members to fly through the rings that will occasionally spawn in two rings (one higher, one lower) which encircle the rest of the Split Dimension. Flying through the rings will gather the energy required to activate the traps; each trap activation requires 10 points of energy. Players can see the current amount of energy in their quest log. There is no circumstance under which a squad that can defeat the bosses of this dungeon will need more than 30 points of energy.
Phase 1b: Slaying Dragons
The rest of the players will have to attack the Hidden Dragons to force Exposed Dragons to come out. Once the squad has gathered a lot of Exposed Dragons, a player can dig one of the traps that are located on top of the towers in order to capture the Dragons; the squad will have to capture 60 Dragons through this method. In order to increase the number of dragons that can be held at once, a cleric in Regeneration Aura (BB) or a heavy armor class (barbarian in particular) can tank the dragons; BB will automatically grab aggro after a short time (a seeker with Yataghan Vortex up can do the same); any other suggested class will need to manually grab aggro. It is particularly helpful to have a wildwalker in squad; their squad buff will drastically reduce the amount of damage the dragons deal, even reducing the amount of damage a cleric in BB takes to one per hit!
Phase 2: Heralds of Cyrak and Miraxes
At 20 and 40 points of energy respectively, the two heralds will appear near the portals to the bosses (a system message will flash across the screen notifying squad members as to such); these are mini-bosses whose deaths substantially weaken their respective boss.
Tempest Dragon Cyrak and Cyclone Dragon Miraxes
There are two large structures in the west and center east of Split Dimension. Inside each is a mirror: entering the front of this mirror will teleport players to that mirror's boss room, entering the back of the mirror will teleport players to the front of the other mirror.
Some squads are powerful enough to spark kill the bosses; squads that are not will need to defeat the bosses normally; only one of the two dragons will drop neuma (should be viewable on the neuma schedule, it is recommended to defeat this boss last).
In order to defeat these bosses through intended means, squad members will need to be in both rooms simultaneously; failure to do so will result in both bosses hiding for half of a minute. The first stage of these bosses is simple: players should focus on the mobs that spawn periodically and get Eye of the Storm in Cyrak's room and Evaporation Crystal in Miraxes' room. The only problem? Eye of the Storm is used against Miraxes and Evaporation Crystal is used against Cyrak. Players should gather enough of these items to defeat each boss.
After enough items are gathered, it's recommended for a single player to hold the boss that drops neuma while the rest of the squad heads to the other boss, using the crystals gained to break that boss's shield periodically. Upon the death of this boss, all squad members should return to the other boss to defeat it in the same way (using the appropriate shield-breaker) (now that only one boss remains, it will not hide)
Past Rewards and Exchange
At one point, each character could do this instance three times a day, but the second and third rewards would be different from the first time.
The first time characters would get 12 Undercurrent Coin for finishing the quests. The second and third time they'd receive a quest to kill the bosses in Wind/Fire. The reward for finishing the quest the second and third time was one ![]() [Primordial Blood] each.
[Primordial Blood] each.
Undercurrent Coins can still be exchanged at the Undercurrent Guardian inside the dungeon for a variety of rewards:
- 1 Undercurrent Coin = 1 Dragon Blood Stone
- 1 Undercurrent Coin = 1
 [Primordial Blood]
 - 2 Undercurrent Coins = 1 [Barbaric Blood]
- 4 Undercurrent Coins = 1 Vitae Pill
- 10 Undercurrent Coins = 1 Dragon Jade Stone
Videos
| Dungeons | |
|---|---|
| The Midlands |
|
| Call to Duty | |
| Lothranis and Momaganon | |
| Morai | |
| Primal World |
|
| Celestial Vale | |
| The Western Steppes | |